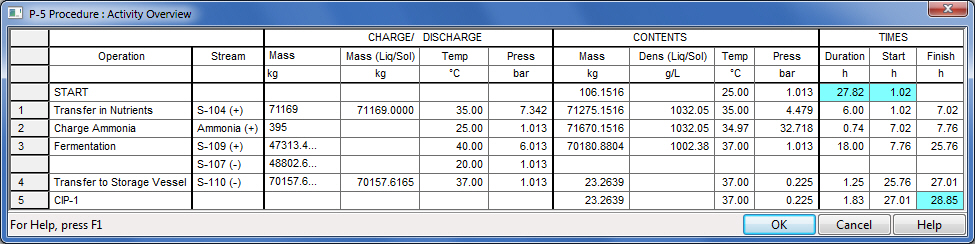
This dialog appears when you right-click on a unit procedure icon and select Procedure Activity Overview from the context menu that appears.
It presents information similar to the Equipment Contents Dialog, but the emphasis is partly on the equipment contents and partly on the streams (amounts) of material moving in and out of the vessel as part of an operation’s execution.
Each line in the grid represents an operation in the operation participating in the selected unit procedure. The information content of the grid can be divided into five sections (column groups):
•Section 1 (Column #1): Operation Name
•Section 2 (Column #2): Stream Name
•Section 3 (Columns #3-16): Stream Information
Presents information about the stream added or removed from the contents of the vessel. Dry solid mass, Aqueous mass and Dry Solid (%) can also be displayed if enabled (see Enable Dry Mass Options). Plus the concentration of the following environmental properties of the stream: COD, BOD5, TSS, TDS, TKN.
•Section 4 (Columns #17-26):
Presents information on a per operation process time basis (actual rate) and on a per procedure cycle time basis (average rate).
•Section 4 (Columns #27-37): Contents Information
Presents information about the contents: total, liquid / solid (L/S) or vapor (V). Dry solid mass, Aqueous mass and Dry Solid (%) can also be displayed if enabled (see Enable Dry Mass Options). Plus the concentration of the following environmental properties of the contents: COD, BOD5, TSS, TDS, TKN.
•Section 5 (Column #38-40): Timing Information
Start time, End time and Duration of each operation.
|
|
A procedure may have been set to execute in one or multiple cycles. In case of a multiple cycle procedure, this dialog presents the progress of a procedure during the first cycle only. |
You may change the contents of this dialog by selecting the Edit Contents option from the table’s right-click menu. When you select this option a dialog appears that allows you to customize which properties are shown; for more details, see Procedure Activity Overview: Contents Selection Dialog. For example, you may choose to exclude input/output stream columns or the equipment contents columns.
All quantities presented in the table are displayed in physical units that can be customized as well. The default units for the entire process can be set from the flowsheet’s right-click menu item named Physical Units Options. Alternatively, you may elect to change the units in just the viewed interface alone by selecting the units of choice from the corresponding drop-down menu (2nd column). You can also change the visual appearance (numeric format, font, color, etc.) for some of the quantities in the table above. For instance, you may need several decimal digits to display the vapor mass but only few for the total mass. Or, in order to highlight the liquid/solid volume (used to size the vessels), you may want to display all such quantities in bold (or even different color). All such stylistic preferences can be modified by selecting Physical Units Format from the right-click menu of the dialog; for more details, see Styles for Common Physical Quantities Dialog. Note that changing the formatting options will directly affect the viewed contents. If you exit the dialog by clicking on the OK button, the changes will be recorded and applied to future visits of the same ‘Procedure Activity Overview’ table dialog. If you don’t want any of the applied formatting to remain permanent for future viewing, then exit the dialog with Cancel.
You may also elect to format a range of cells from the procedure activity overview table. For example, you may want to change the background color, or show a frame around them, etc. Such visual enhancements can be applied by selecting the Cell Format. option from the table’s command men; for more details, see Format Cells in a Table Dialog. However, keep in mind that such visual improvements are not going to be stored (as part of the interface) and after exiting (even if you click on OK) they will be erased. They are only meant to be applied before the interface is captured as part of a report. For permanent visual enhancement, please use the Styles for Common Physical Quantities Dialog.
Finally from the context menu, you can select Print to have the entire grid printed to the default printer. You can also Copy all or parts of the grid and later paste it to MS-Word or MS-Excel (as a spreadsheet).
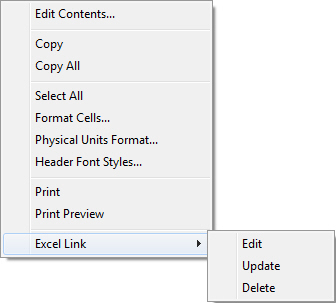
The right click context menu allows you to perform other actions as well.
See the following table for details on each command:
|
Edit Contents |
|
Customize the contents of the table. |
|
Copy |
|
Allows you to copy the selected range of cells. Note that once you have copied a range of cells, you can paste them into MS-Word or MS-Excel (as a spreadsheet) |
|
Copy All |
|
Allows you copy all the cells in the grid. Convenient for copying-and-pasting the entire grid elsewhere as a grid. |
|
Select All |
|
Will select all cells in the grid. Convenient for applying a formatting option to all the cells. |
|
Format Cells |
|
Will present you with a dialog that allows you to modify the display format (style) of the selected cells. Note that this format will overwrite the default style (see Cell Format Dialog). |
|
Physical Units Format |
|
Format Will change the styles used to display each type of physical unit (density, volume, etc.). The styles modified from this dialog will only apply to the selected unit procedure. You can also change the styles so that they apply to all procedures (see Physical Quantities Format Dialog) |
|
Header Font Styles |
|
Will bring up a dialog that allows you to modify the style of the row and column headers of the table. |
|
|
|
Allows you to print the entire grid. |
|
Print Preview |
|
Will show a print-preview of the grid before it is printed. |
|
Excel Link |
Edit |
Edit options for Table to Excel Link (see Link Table to MS-Excel Dialog) |
|
|
Update |
Update data in the linked excel file. |
|
|
Delete |
Delete data in the linked excel file. |
