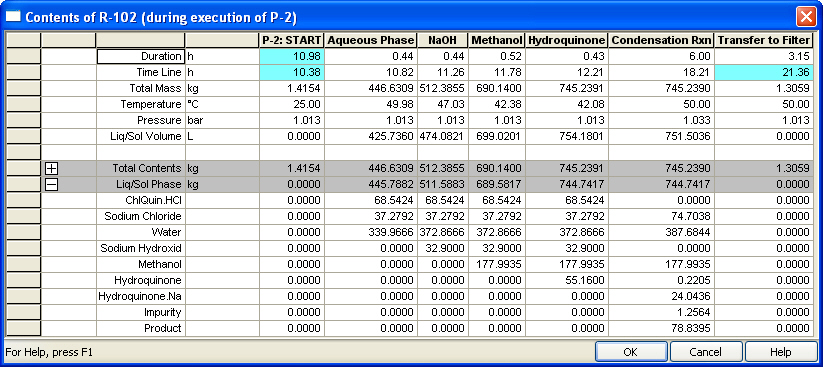
This dialog appears when you select Equipment Contents } During <Procedure Name> or Equipment Contents } During All Procedures from a procedure’s context menu (the second option appears only if the equipment resource hosts more than one procedures). The procedure must be hosted by an equipment resource whose type corresponds to equipment with volume (i.e. capable of holding material).
The information in this interface is presented in terms of a multi-column table. Each column headed by the name of an operation, represents the state of the equipment resource at the end of that operation. There are one or two column preceding the column corresponding to the first operation in the procedure’s operation sequence. The column with the title ‘START’ is always shown first. This column will display the contents of the equipment before this procedure started execution. The duration line will show the total duration for the unit procedure's cycle (highlighted in blue) and the time line entry will show the time that the procedure will start executing (also highlighted in blue). If the procedure employs auto-initialization (see Default Input Ports & Auto-Initialization) to bring in material from the default input stream, then another column appears after START showing the contents of the vessel after auto-initialization. Similarly, if the procedure employs auto-removal (see Default Output Port & Auto-Removal), then another column appears after the last operation.
|
|
If the equipment resource is deployed by more than one number of units, the equipment contents shown indicate the amounts held collectively by all units. If the procedure is set to execute in multiple cycles, then the amounts shown before and after each operation correspond to the equipment contents after the execution of the first cycle. |
For each column, data are presented in different rows organized in five sections
|
|
It is important to note that the time line in this table is determined by the order each operation appears in the operation sequence of the procedure and not its actual start / end time. Since each operation’s timing (start time and/or duration) can be set by the user, it is possible that: |
1. Time Section: This section shows time related data: Duration and Time Lin
2. Total Contents Section: This section shows in summary and in detail (on a component-by-component breakdown) the amounts present in the vessel (both in the solid/liquid phase as well as vapor phase together). You may choose to hide the component details by clicking on the +/- button showing at the left of ‘Total Contents’.
3. Liquid/Solid Contents Section: This section shows in summary and in detail (on a component-by-component breakdown) the amounts present in the liquid/solid phase in the vessel. You may choose to hide the component details by clicking on the +/- button showing at the left of ‘Liq/Sol Phase’.
4. Vapor Contents Section: This section shows in summary and in detail (on a component-by-component breakdown) the amounts present in the vapor phase in the vessel. You may choose to hide the component details by clicking on the +/- button showing at the left of ‘Vapor Phase’.
5. Summary Section: This section shows the total mass, liquid/solid mass, liquid/solid density, liquid/solid volume, temperature and pressure.
|
|
When the component details are presented, only component present at some point during the procedure’s execution are shown. In other words, component that do not participate at all in any of the operations included in the procedure are omitted. |
You may change the contents of this dialog by selecting the Edit Contents option from the table’s right-click menu. When you select this option a dialog appears that allows you to customize which properties of the material contents are shown, see Equipment Contents Customization Dialog. For example, you may choose to exclude the vapor section, or you may choose to exclude some component(s) from all sections.
All quantities presented in the table are displayed in physical units that can be customized as well. The default units for the entire process can be set from the flowsheet’s menu (Physical Units Options). Alternatively, you may elect to change the units in just the viewed interface alone by selecting the units of choice from the corresponding drop-down menu (2nd column). You can also change the visual appearance (numeric format, font, color, etc.) for some of the quantities in the table above. For instance, you may need several decimal digits to display the vapor mass but only few for the total mass. Or, in order to highlight the liquid/solid volume (used to size the vessels), you may want to display all such quantities in bold (or even different color). All such stylistic preferences can be modified by selecting Physical Units Format from the right-click menu of the dialog, see Styles for Common Physical Quantities Dialog. Note that changing the formatting options will directly affect the viewed contents. If you exit the dialog by clicking on the OK button, the changes will be recorded and applied to future visits of the same Equipment Contents dialog. If you don’t want any of the applied formatting to remain permanent for future viewing, then exit the dialog with Cancel.
You may also elect to format a range of cells from the equipment contents table. For example, you may want to change the background color, or show a frame around them, etc. Such visual enhancements can be applied by selecting the Cell Format option from the tables command menu, see Format Cells in a Table Dialog. However, keep in mind that such visual improvements are not going to be stored (as part of the interface) and after exiting (even if you click on OK) they will be erased. They are only meant to be applied before the interface is captured as part of a report. For permanent visual enhancement, please use the Styles for Common Physical Quantities Dialog.
The right click context menu allows you to perform other actions as well.
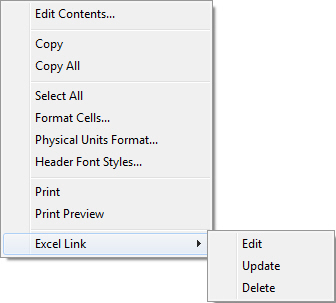
See the following table for details on each command of the context menu:
|
Edit Contents |
|
Customize the contents of the table. |
|
Update |
|
Will force the stream table to update its contents. Pro-Designer will automatically update the stream contents when the need arises (e.g. after a M&E balance execution). However, if you feel that the numbers shown are not in sync, you may request the table to update its contents by selecting this option. |
|
Copy |
|
Allows you to copy the selected range of cells. Note that once you have copied a range of cells, you can paste them into MS-Word or MS-Excel (as a spreadsheet) |
|
Copy All |
|
Allows you copy all the cells in the grid. Convenient for copying-and-pasting the entire grid elsewhere as a grid. |
|
Select All |
|
Will select all cells in the grid. Convenient for applying a formatting option to all the cells. |
|
Format Cells |
|
Will present you with a dialog that allows you to modify the display format (style) of the selected cells. Note that this format will overwrite the default style (see Cell Format Dialog). |
|
Physical Units Format |
|
Will change the styles used to display each type of physical unit (density, volume, etc.). The styles modified from this dialog will only apply to the selected unit procedure. You can also change the styles so that they apply to all procedures (see Physical Quantities Format Dialog) |
|
Header Font Styles |
|
Will allow you to change the font style of row and column headers. |
|
|
|
Allows you to print the entire grid. |
|
Print Preview |
|
Will show a print-preview of the grid before it is printed. |
|
Excel Link |
Edit |
Edit options for Table to Excel Link (see Link Table to MS-Excel Dialog) |
|
|
Update |
Update data in the linked excel file. |
|
|
Delete |
Delete data in the linked excel file. |


