This dialog appears when selecting the Excel Link } Edit menu option from:
1. The equipment contents table
2. The procedure activity table
3. The component properties table
4. The stream summary table
It allows the user to create and customize an explicit link between the displayed table (and its contents) to an area in an Excel file. Once this link is established, then SuperPro Designer can update the Excel spreadsheet every time information displayed in that table has changed. This is a very powerful and very easy to setup way to export information from SuperPro Designer and bring it into an area where it can be further manipulated or presented in any the user chooses.
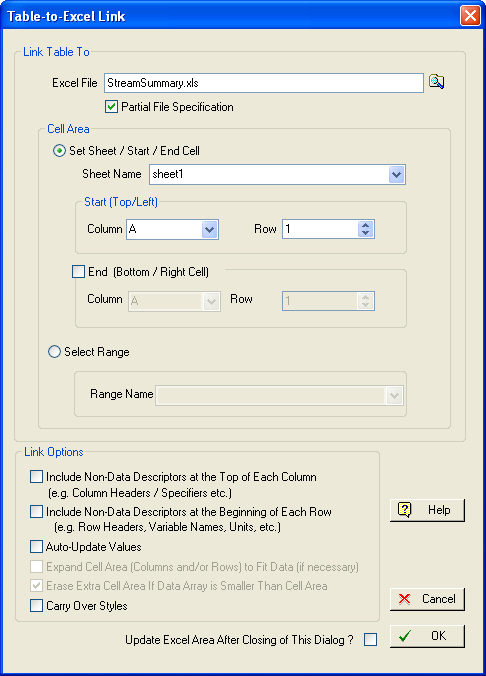
The dialog is made up of two boxes:
The “Link to” box where the user provides the exact coordinates of the cell area that is to receive the information from the source table and
The “Link Options” box, where the user sets options that specify how and when the destination cell area will be update.
When exporting the contents of a table the user must describe a destination area for the data. This is done in two steps: Selecting an Excel file and then selecting a cell destination range inside the file.
The first thing that you need to specify is an Excel file (with the proper ‘.xls or .xlsx’ extension). Please note that the file must exist at the time that you chose to establish the link. You can either type the name of the file in the field provided or click on the Select File  and select the file yourself. The check-box under the file name field labeled ‘Partial Filename Specification’ is extremely important. If the box is not checked, then the file name field is supposed to contained the full path (starting from a drive specification like c: or d:) down to the filename for the target Excel file. If the check box is checked, on the other hand, you only need to specify the path relative to the location where the current SuperPro Designer file is saved. If the ‘.xls’ file is in the same folder as the ‘.spf’ file then you only need to specify the name of the file. This is especially important if you are planning on shipping your process file to one of your colleagues. If you introduced such Excel links in your file, then you must make those ‘.xls’ files available as well. In that case, it is strongly recommended that you use the ‘partial file specification’ when you establish the link so that when the SuperPro Designer file and Excel file are received by a another party and saved anywhere on the hard disk of the recipient of the files, they will be able to function as a source-and-destination together.
|
|
If you have the ‘Partial Filename Specification’ checked and then click on the browse button, the displayed browsing dialog will only show folders (and their contents) located at the level where the process document is currently saved since you can’t reference files above this location. |
After you have selected an ‘.xls’ file you must select the range of cells where the table information will be placed. There are two different ways that you can choose the destination cell range:
a) Select the sheet name and the starting cell (as a column, row pair) where the top-left cell of the source information will be pasted and (optionally) the end cell (as a column, row pair) where the last (bottom-right) cell with the pasted information will be. If you have not chosen an ending cell then the application will attempt to paste the information till it fits it all. Any cells with information currently existing in the destination area will be overwritten. If you have chosen an end cell but the information amount to be pasted is different than the designated area then what happens depend on the choices made in the link customization (see below).
b) Select a predefined range name available from the destination excel file. For more information on how to define assign a name to a range of cells in your spreadsheet consult your Excel manual or online help.
The first two choices allow you to include/exclude any non-data columns and/or rows (such as descriptors or headers for the columns and for the quantities that make up the information in the table).
The ‘Auto-Update Values’ option if checked, will automatically update the destination area every time the information contained in the source table changes. For example, if the source table is the stream summary table, every time the M&E balances conclude and the contents of the table are updated, the link will update the cells in the Excel spreadsheet.
The “Expand Cell Area to Fit Data” option applies when the destination area has been fully specified (in terms of an end cell). In that case, and if the source data requires a larger area to be pasted, if this check box is set then the link will attempt to insert as many rows and/or column in order to fit the data carried over. If not check, then some data may be lost.
The “Erase Extra Cell Area” option applies again only when the destination area is fully specified in terms of an end cell. In that case, and if the source information requires a smaller are to fit the data, then checking this option will give permission to the link to remove any unused columns and/or rows so that they don’t appear empty of information.
The ‘Carry Over Styles’ option if checked, will carry over to the destination cell range not only the values contained in the source table, but also any formatting that may existed on any of the quantities described in the table. To find out how to apply formatting to given physical quantities presented in a table, see Styles for Common Physical Quantities Dialog.
