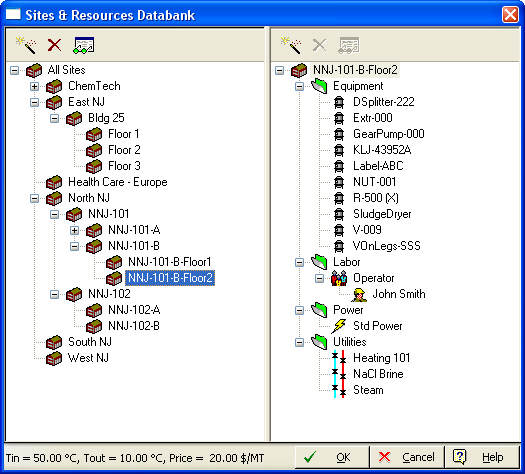
This dialog appears by selecting Databanks } Sites and Resources from the main menu of the application.
From this dialog you can:
1. View the contents of the sites & resources databank (all residing in the ‘User’ database).
2. Add, delete or modify the properties of sites & resources in that databank.
On the left pane, after you expand the parent node named ‘All Sites’, you can see a list of currently defined database sites (facilities) and sub-sites organized in a hierarchical tree. When a site or sub-site is selected on the left pane, all its resources are displayed on the right pane. These are organized in four groups (equipment, heat transfer agents, labor types, and power types).
► To add a new site...
1. On the left pane, select the database site that will be the parent of (or will ‘own’) the soon-to-be-created site or select the top level node (‘All Sites’) to create a parent site. Then, click on the Create ( ) button on the toolbar that lies above the pane. Or, right-click on the parent node to bring up its context menu and then select Add New Site (when the parent node is ‘All Sites’) or Add Sub-Site (when the parent node is any other site) on that menu. Either action will display the Site Properties Dialog.
2. In the Site Properties Dialog, describe the new site’s properties and click on OK. Notice that a new node will be added to the parent node’s hierarchy in the left pane.
► To view/edit the properties of a site...
1. Make sure you can view the existing sites on the left pane by expanding the top level node (‘All Sites’).
2. Select the desired site on the left pane, and then click on the View/Edit Properties of Site ( ) button above the same pane. Or, select the desired site on the left pane, then click on the node representing that site on the right pane, and then click on the View/Edit Properties of Site (
 ) button above that pane. Either action will display the Site Properties Dialog. Alternatively, you can right-click on the site node and select Edit Site Properties, or simply double-click on the site node, to display the above dialog.
► To delete a site…
1. On the left pane, select the site that you want to delete.
2. Click on the Delete ( ) button above the same pane. Alternatively, right-click on the site and select Delete Site on the context menu.
► To add a new resource to a site...
1. Select the corresponding site on the left pane and the corresponding resource category on the right pane. Then, click on the Add New ( ) button above the same pane. Or, right-click on the resource category and select Add Equipment or Add Labor Type etc. on the context menu that appears. Depending on the resource category you selected, one of the following new resource definition dialogs will appear:
New Site-Equipment Dialog (when introducing a new equipment)
Add Heat Transfer Agent Dialog (when introducing a new heat transfer agent resource)
Add Labor Type Dialog (when introducing a new labor resource)
Add Power Type Dialog (when introducing a new power resource)
2. Describe the properties of the new resource in the respective dialog and click OK. Notice that a new node will be added under the corresponding resource category.
► To view/edit the properties of a resource...
1. Make sure you can view the existing sites on the left pane by expanding the top level node (‘All Sites’). Select the desired site on the left pane.
2. Select the desired resource on the right pane and click on the View/Edit Properties of Utility ( ) button above the same pane. Alternatively, you can right-click on the resource and select Edit Equipment Properties or Edit Labor Type Properties etc. on the context menu that appears, or simply double-click on the resource as a shortcut. Depending on the resource category, one of the following resource data dialogs will appear:
Site Equipment Properties Dialog (for equipment resources)
Heat Transfer Agent Properties Dialog (for heat transfer agent resources)
Labor Type Properties Dialog (for labor resource)
Power Type Properties Dialog (for power resources)
Please note that the process of adding new equipment to a site and editing equipment data is identical to that described in the description of the Site-Equipment Databank.
► To delete a site resource from the Sites-and-Resources databank…
1. Select the resource that you want to delete.
2. Click on the Delete ( ) button. Alternatively, right-click on the resource and select select Remove Equipment or Remove Labor Type etc. on the context menu that appears.
► To add new site staff...
1. Select the corresponding site on the left pane and the corresponding labor type that the new staff will belong to on the right pane. Then, click on the Add New ( ) button above the same pane. Or, right-click on the labor type and select Add Staff on the context menu that appears. Either action will display the Labor Type Properties Dialog.
2. Describe the properties of the new staff in the respective dialog and click OK. Notice that a new node will be added under the corresponding labor type.
► To view/edit staff data...
1. Make sure you can view the existing sites on the left pane by expanding the top level node (‘All Sites’). Select the desired site on the left pane.
2. Select the desired staff on the right pane and click on the View/Edit Properties of Staff ( ) button above the same pane. Alternatively, you can right-click on the staff and select Edit Staff Properties on the context menu that appears, or simply double-click on the staff as a shortcut. Either action will display the Labor Type Properties Dialog.
► To save the Site-and-Resources databank…
3. To save the changes made to the databank back into the ‘User’ database, simply click OK to close the dialog.
|
|
Once the changes in the databank are saved into the ‘User’ database, they are irreversible. In case you change your mind about changes made, and these are not yet saved, you may cancel changes and revert to the saved databank by clicking Cancel on the dialog. |
See Also:
