 ) above the procedure’s icon.
When simulating a large process, oftentimes the outcome is not what a user may expect. The calculations may end up in an abrupt stoppage, or they may conclude but the outcome may not be what a user may expect. Typically the calculations will go wrong first in some unit procedure (or more specifically in one of a unit procedure’s operation outcomes) and then, they will be propagated downstream to others perhaps leading to a chain of warnings and/or error messages. The use of breakpoints can greatly facilitate the detective work that needs to be done in order to locate where things start to go wrong.
Placing a breakpoint somewhere in the process, is similar to placing a red-light in the streaming of the simulation calculations. As soon as the simulation engine of the application sees the red light, the simulation engine comes to a screeching halt, and awaits further instructions from the user as to what to do next. Since the simulation engine executes the solution of the entire process by solving one procedure at a time, it makes sense to allow users to place breakpoints around a unit procedure. You can place a breakpoint within or around a unit procedure by visiting the its Breakpoints Dialog (select Set Breakpoints from the procedure’s context menu). You request the simulation engine to stop:
1. Right before the calculations in this procedure are about to begin (upon entering) and before any auto-initialization may be executed (see below).
2. Right after automatic material pull-in or auto-initialization (if applicable, see Default Input Ports & Auto-Initialization)
3. Before any of the operations that appear in the unit procedure’s queue.
4. Before the automatic material push out or auto-removal (if applicable, see Default Output Port & Auto-Removal)
5. Right after the calculations in this procedure are finished (upon exit).
To indicate that a breakpoint has been placed in or around a unit procedure, the application will display an indicator ( ) above the procedure’s icon.
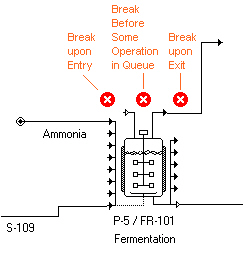
Breakpoints Indicators Around a Unit Procedure Icon.
If the breakpoint is placed upon entering the procedure’s calculations, then the breakpoint indicator is shown near the entry side of the procedure; if the break in the calculations is to happen after the ending the calculations in one of the contained operations, then the breakpoint indicator shown above the procedure and in the middle. Finally, if the breakpoint is placed to force the calculations to stop right after the end of the procedure’s simulation, then the breakpoint indicator shows above the procedure’s icon and near the exit side of the procedure. Sometimes you may need to temporarily de-activate a breakpoint but without removing it (see Breakpoints Dialog). If a breakpoint has been deactivated it shows grayed out (  ).
).
When the simulation engine reaches a breakpoint and stops, SuperPro Designer displays a status icon under every unit procedure in the process. For the unit procedure that forced the calculations to stop, the indicator is one of the following:
 the simulation calculations have stopped right after entering this procedure
 the procedure calculations have stopped before one of the operations in the queue
 the simulation calculations are stopped right before exiting this procedure
For all other procedures (other than the one where the active breakpoint exists), here are the possible indicators and their meaning:
 the procedure has not been visited yet
 the procedure has been successfully simulated already
 the procedure is being solved recursively (as part of loop convergence)
 the procedure solution ended unsuccessfully (as part of an un-converged loop)
 the procedure solution ended unsuccessfully (an error was encountered)
|
|
When the simulation engine is stopped in the midst of its calculation sequence, you can view the values of streams on the stream summary toolbar (see The Stream Summary Table) or visit any of the process elements i/o simulation dialogs (unit procedures, operations, streams, equipment, equipment contents, etc.) and inspect (even change) their property values. If you do change values, then note that the new values will only affect the outcome of the simulation if they are applied to operations in procedures that have not been solved yet (in other words, the |
When dealing with breakpoints, the simulation toolbar and all the options that presents, are very important. Each button on the toolbar can direct the simulation engine what to do next: it can move on to the end of the next operation, or at the end of the current procedure, or directly to the beginning of the next procedure; you can even stop the simulation altogether or skip right through to the next breakpoint. You can show/hide the simulation toolbar by selecting Simulation Control } Toolbar from the View menu. For more details, see Simulation Control Toolbar.
|
|
After going through several debugging sessions where the simulation engine reaches (one or more) breakpoints and is controlled manually by the user, one may find it necessary to make a run where the engine doesn’t stop at the preset breakpoinst, but attempts to complete the calculations from beginning to end without a stop. For this reason, there’s an entry in the flowsheet’s context menu (Breakpoints } Deactivate All) that will de-activate (without removing) all the preset simulation breakpoints. Later you may visit the same menu and this time chose Breakpoints } Activate All to re-activate all existing simulation breakpoints. Note that once one or more breakpoints have been set, you can quickly remove them all by selecting Breakpoints } Clear All from the flowsheet’s context menu. |


