
Material flows in and out of unit procedures via streams, see Streams. Streams engage to specific locations on a unit procedure called ports. A port is simply a connection point that can be used by an incoming or an outgoing stream. Input ports are those used as ending points of streams with flow into the unit procedure and output ports are touch points for streams that represent material leaving the unit procedure. Since there are two types of material flows (bulk and discrete) (see Types of Streams) there are also two types of ports: bulk flow ports and discrete flow ports. Only bulk streams can use bulk flow ports and only discrete streams can use discrete flow ports. Note that input/output bulk ports are drawn slightly differently from input/output discrete ports
Bulk and discrete, input and output ports around a unit procedure icon.
The location of each port can be easily recognized since the mouse pointer changes as soon as the mouse is over a port:
● ‘Bulk Flow Port’ pointer (input or output):

● ‘Discrete Flow Port’ pointer (input or output):

Output ports serve as starting points for intermediate and output streams and input ports serve as ending points of intermediate and input streams. Having the mouse pointer change when the system detects that it is over a port, greatly facilitates the drawing of a stream since it makes it very easy to locate the start point (some output port) or end point (some input port) of a stream (if the stream is attached to a unit procedure). Please note that an input port that may already have a stream attached is considered ‘busy’ by the system and therefore it is unavailable as an ending points for an input stream. Similarly, an output port with a stream already hooked on to it, is also considered ‘busy’ and therefore, it is not available as a starting point for an output or an intermediate stream.
Some procedure types are hosted by an equipment resource that allows for both a bulk and a discrete port. For instance, consider the Filling procedure shown in The ‘Filling’ procedure features a bulk input and a discrete input port and a discrete output port..
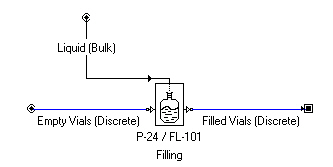
The ‘Filling’ procedure features a bulk input and a discrete input port and a discrete output port.
One feed (input) line provides the empty vials (bottles) and it is connected to the discrete input port. The other feed (input) port allows for the liquid material (in bulk) to be brought in and used to fill up the vials. Of course, the single output line (stream) of the procedure is a discrete line of filled vials, and therefore it requires a discrete output port.
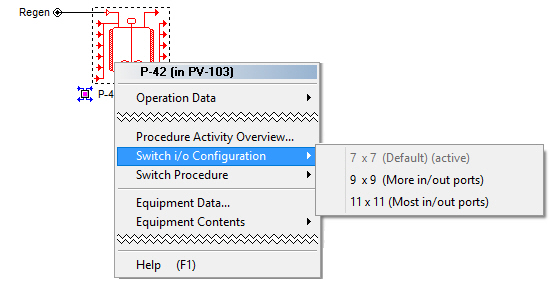
Since each port can only serve one stream, and within a single unit procedure (represented by its icon) there could be many operations, it is possible that you may run out of ports. SuperPro Designer allows you to replace the original icon which, by default, represented the procedure with another that can feature more input and/or output ports. Not all procedure icons feature several i/o configurations to choose from. If they do offer that option, it can be accessed from the icon’s context (or right-click) menu (see Switching to another i/o configuration (for more or fewer input and output ports).) For most icons that do offer the choice of multiple i/o configurations, there are usually 3 levels:
1. Default
2. More in/out Ports
3. Most in/out Ports
Should you decide to switch to, for instance, the “11x11 (Most in/out Ports), notice how if any stream already exist connected to the ports of the icon, they will be carried over to the new configuration set. If a stream is connected to a dedicated port (e.g. ‘filtrate’), after moving to the new configuration, it will be moved to the corresponding port (for a filtrate) in the new i/o set of ports. While switching from a lower set of ports to a higher, all stream can be carried over, the opposite is not always possible. For example, if you have streams connected to the 10th output port, and now you switch to a 7x7 configuration, you will receive an error message that SuperPro cannot execute the i/o configuration switch. However, it is very easy to more streams from one port to another: just simply click and drag the stream to relocate them to a lower port (e.g. 6th) then attempt to do the i/o configuration switch.
Switching to another i/o configuration (for more or fewer input and output ports).
|
|
As you click-and-drag a stream’s end to relocate it to a different in/out port, you will notice that if there’s an operation that was engaging that stream for material transfer in or out (e.g. a ‘Charge Operation’) SuperPro will automatically change the input or output port assignment for you (assuming the new port where the stream moved is a ‘legal’ location. For example, if you moved an output stream connected to a storage icon from any port to the top output port which is reserved for emissions, the associated transfer-out operation cannot receive that assignment as the output port used to move material out of the vessel, so the old assignment will remain. Since there is no stream attached to that old location user will have to revisit the operation’s dialog and make a proper choice and/or perhaps create a new stream. Also, a stream happens to be connected to a default input or output port, and it is not being referenced explicitly in any of the operation’s in the queue, changing the i/o configuration will result in the stream also being moved to the (new) default input or output port automatically. |
.
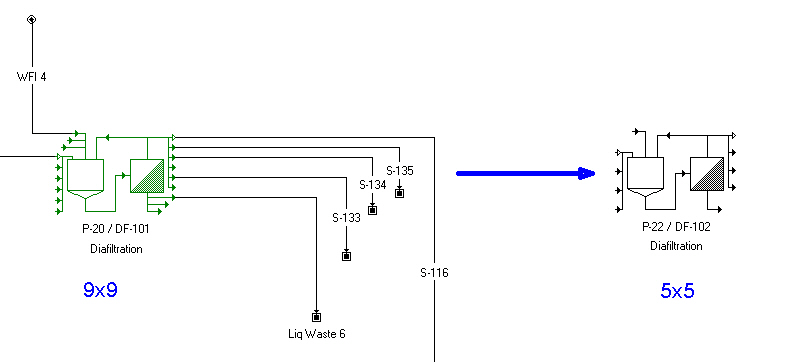
The program may prevent you from switching to another (usually smaller) i/o configuration if streams are connected to ports (on the input or output side) that do not exist in the selected new i/o configuration. For example, if you have a 7-output configuration and a “Transfer Out” operation is using the 6th output port, switching to a i/o configuration with 5 output ports is not possible. In other cases, the destination configuration may have the same port ID available for the stream, but if ports serve special purposes and the stream’s owning operation is not using the stream in a way that makes it eligible for that port the switch will also be prevented. For example, consider Fig. 5.10, where we are attempting to switch from a 9x9 diafiltration configuration with just 5 current output lines to a 5x5 configuration. One may think that the switch would be allowed since there appear to be enough output ports to accommodate all output lines. However, the 5x5 target configuration reserves the bottom output for the retentate, so there is no room to place all the currently connected lines and thus this switch is rejected. Some other times, the system will automatically reallocate some of the outputs so that the switch will be made possible. For example, consider the connection of the diafilter shown in
Switching to another i/o configuration sometimes not allowed.
Fig 5.11. If the output streams were to be moved using the same output port IDs (1,3,6 and 9) there would be no corresponding ports in the destination 5x5 configuration. However, the program would smartly detect that it can compact output streams S-134 and S-133 so that they can now be attached to output ports #2 and #3. Finally, the retentate output from port #9 is moved to the new retentate output port (port #5) and thus the switch is made possible.
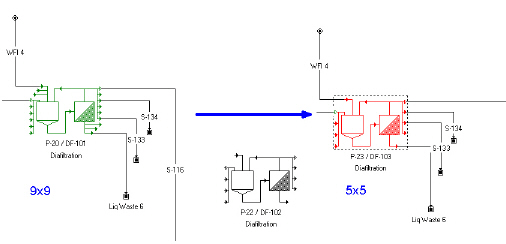
Switching to another i/o configuration is accomplished by smartly moving streams (if possible).
If you wish to right away insert the procedure with an icon that features another i/o configuration (other than the default), after selecting from the Unit Procedures menu, the procedure type that you wish to insert next (e.g. “Storage, Bulk, Batch, in a Blending Tank), hold the CTRL key down and then click to insert the procedure. You will first be presented with a menu of available configuration as shown in see Selecting the preferred i/o configuration upon creation of the unit procedure.. You can choose any one of the available options and the corresponding icon will be used immediately after to create the unit procedure.

Selecting the preferred i/o configuration upon creation of the unit procedure.
Out of all input ports, one of them is special and considered as the default input port. The default input port has the following special property: it allows the material of the stream attached to it to be automatically forwarded (pushed) into the unit procedure's equipment (i.e., without the user having to define a special ‘Transfer in’ or ‘Charge’ operation). This function is called the auto-initialization of a unit procedure. The auto-initialization of a unit procedure is only activated if the unit procedure is set to operate in batch mode and it doesn't have any operations in its operation sequence that themselves transfer in any material. This behavior presents a very convenient way to transfer material into a unit procedure without having to worry about their timing (scheduling)
|
|
The auto-initialization of a batch unit procedure is active only if there are no operations in the operation sequence that transfer material into the unit procedure (e.g. a transfer-in, charge, pull-in, etc.) and of course, if there is a stream attached to the default input port. In other words, you must either completely disregard the timing (scheduling) of all material entering a procedure or schedule all of it. |
.
Notice how SuperPro Designer displays the default input port with a hollow arrow whereas all other ports are displayed with a solid arrow:

The default input and default output ports are drawn differently (hollow arrow).
The default output port is a similar concept applied to the output of material from a unit procedure. The default output port is a designated port that automatically transfers out of the equipment contents any material remaining after the conclusion of the last operation to the attached stream (assuming that the hosting equipment has the ability to hold material.) This behavior of a unit procedure is called the auto-removal. Just like the auto-initialization the auto-removal is a convenient way to remove material without having to worry about the timing (scheduling) of the removal operation.
|
|
The auto-removal of a batch unit procedure is active only if there are no operations in the unit procedure’s queue that remove material to a stream and of course, only if there is a stream attached to the default output port. In other words, you must either completely disregard the timing (scheduling) of all material leaving a procedure or schedule all of it. |
The notion of the default input and/or output port also exists on icons representing procedures hosted by equipment that are meant to be functioning in a continuous (or semi-batch) mode: for example, a multi-effect evaporator, a thin-film evaporator, an absorber or a stripper. In such continuously operated equipment that may have more than one inputs or outputs, the default input (or output) port is used to indicate the ‘main’ feed (or outlet) of the procedure. In other words, the main input/output indicate where the process stream is expected to be connected. In continuous procedures the notion of auto-initialization or auto-removal does not apply.


