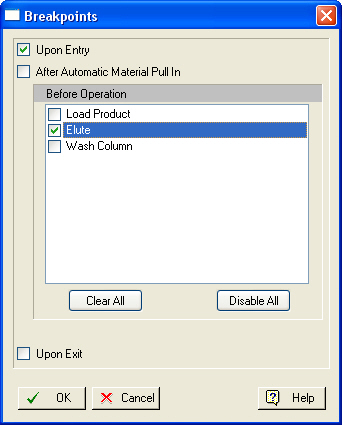
This dialog appears when you select Set Breakpoints from a unit procedure’s context menu. It allows you to set simulation breakpoints within and around the selected procedure. For more details on breakpoints, see Simulation Breakpoints. The choice of locations is explained below.
|
|
Note that the check boxes in this dialog support three states: checked, unchecked and hollow (or with a filled-in square) to correspond to the three possible states of a breakpoint: set, cleared or deactivated. |
•Upon Entry:
If you set a breakpoint on this location, then the simulation engine will pause as soon as this procedure’s turn has come to be solved. The calculations will stop even before any automatic material pull-in is activated (if applicable). Once the calculations stop at this point, you may use the simulation control toolbar to either step into the procedure, step across the procedure (skip to the end), or go to the next breakpoint or the selected procedure see Simulation Control Toolbar.
•After Automatic Material Pull-in:
This location may not be available (shown on the dialog) if the appropriate conditions for automatic material pull in do not exist (see Default Input Ports & Auto-Initialization) If you set a breakpoint on this location, then the simulation engine will pause right after the material residing on the default input stream is carried into the procedure’s initial contents. Once the calculations stop at this point, you may use the simulation control toolbar to either continue with the calculations in the procedure (step through the next operation), step out of the procedure (skip to the end), or go to the next breakpoint or the selected procedure see Simulation Control Toolbar.
•Before an Operation (in the procedure’s queue):
If you set a breakpoint on this location, then the simulation engine will pause right before the checked operation is about to be simulated. Once the calculations stop at this point, you may use the simulation control toolbar to either continue with the calculations within the same procedure (step through the next operation), step out of the procedure (skip to the end), or go to the next breakpoint or the selected procedure see Simulation Control Toolbar:
•Before Automatic Material Push-out:
This location may not be available (shown on the dialog) if the appropriate conditions for automatic material push out do not exist (see Default Output Port & Auto-Removal) If you set a breakpoint on this location, then the simulation engine will pause right before the liquid/solid material residing as final contents in the procedure is carried out onto the procedure’s default output stream. Once the calculations stop at this point, you may use the simulation control toolbar to either step out of the procedure (and stop right after the exit), go to the next procedure, or go to the next breakpoint or the selected procedure see Simulation Control Toolbar.
•Upon Exit:
If you set a breakpoint on this location, then the simulation engine will pause right after the simulation of the procedure has just ended. Note that if any automatic material push out mechanism is active, this location is after the auto-removal has been applied. Once the calculations stop at this point, you may use the simulation control toolbar to either step through the next procedure (and stop right after the exit), or go to the next breakpoint or the selected procedure see Simulation Control Toolbar:
