Operation Sequence
Unit procedures contain a sequence of one or more operations. Most unit procedures contain already an operation by the time they are first created. For instance, when you insert a microfiltration (batch) unit procedure, it already contains a ‘Batch Concentration’ operation. You can, of course, add more operations later. Some unit procedures contain no operations when they are first created. For example, all the Batch Vessel Procedures (in a Reactor, in a Fermentor, in a Seed Fermentor, etc.) start out without any operation in their sequence and therefore they simulate no action. They are considered ‘general purpose’ unit procedures and as such they do not contain (by creation) any predetermined operations. You must visit their ‘Add/Remove Operations’ dialog (aka The Operation Sequence Dialog) and add operations to them. Operations can be added/removed/re-ordered in a unit procedure by right-clicking on the unit procedure's icon and then selecting the option. Remember that a unit procedure has a dual behavior depending upon its operating mode. If it is a continuously operated procedure, then one and only one operation can be carried out by this unit procedure and the menu option will not be available in the context menu of this unit procedure.
|

|
As a shortcut, you can access The Operation Sequence Dialog of a unit procedure in batch mode by double-clicking on its icon. Double clicking on a procedure that is set to operate in continuous mode will bring up the i/o dialog of the (only) operation in it.
|
Note that you can add as many operations as you wish in the operation list of a batch unit procedure. However, the types of operations available depend on the specific type of unit procedure you are editing. For example, for a Microfiltration (Batch) unit procedure the available options for operations are:
1. CIP (Clean-in-Place)
2. Concentrate
3. Flush
4. Hold
5. SIP (Steam-in-Place)
In a Gel Filtration procedure on the other hand the list of available operations are:
1. CIP (Clean-in-Place)
2. Elute
3. Equilibrate
4. Hold
5. Load
6. Regenerate
7. SIP (Steam-in-Place)
8. Wash
|

|
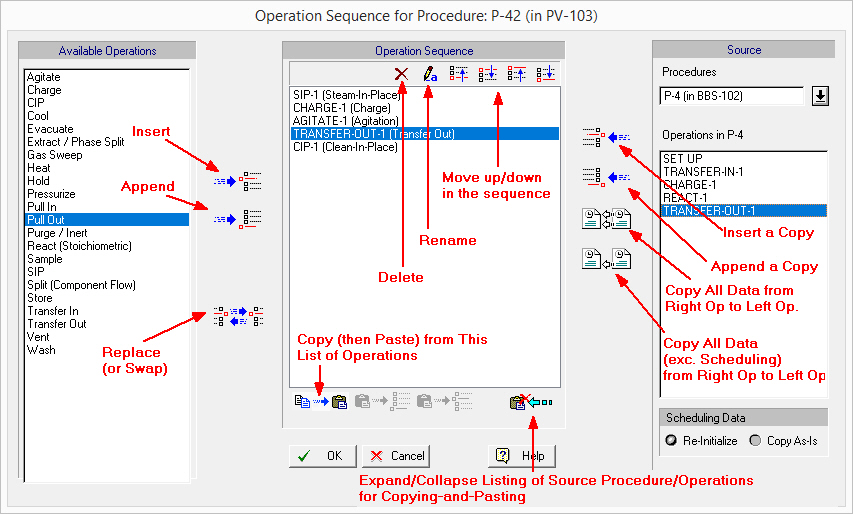
From The Operation Sequence Dialog (aka ‘Add/Remove Operations’ dialog) you can do a lot more than just adding or deleting an operation in the procedure’s queue (see The Operation Sequence Dialog (or Add-Remove Operation Dialog). below).You can also:
● Rename an existing operation
● Change its location in the order (move it up or down the sequence
● Replace (swap) an existing operation with another (replacing preserves references to the operation from others - e.g. for scheduling purposes)
● Copy an existing operation (in the queue) and paste (insert) a duplicate in the queue
● Copy an existing operation from another procedure and paste (insert) a duplicate in this procedure (you must click at the bottom right button to see the expanded view of the dialog in order to be able to select a source procedure and operation).
● Copy all of an operations’ data (incl. scheduling references) and paste it (must be of same type) or just copy the simulation data (but not the scheduling).
|
It is very important to understand that for material and energy (M&E) balances, when the time comes to simulate the process step represented by a unit procedure, SuperPro Designer’s simulation engine executes the actions that each operation represents one-after-another (always) and in the order that they appear in the unit procedure’s list. For example, if you insert first a ‘Charge-A’ then a ‘Charge-B’ and then a ‘Heat’ operation, this is exactly what will be simulated. For timing purposes, you can set the durations and start times of all these operations to coincide (if that is what actually happens). So, you can set the start time of the ‘Charge-A’ to coincide with the start time of ‘Charge-B’ as well as the start time of ‘Heat’ and you can set the durations of ‘Charge-B’ and ‘Heat’ to be the same as the duration of ‘Charge-A’. For more information on how to set the timing of operations, see The Scheduling Tab. Note that it is possible that the final outcome of the mass and energy balance calculations to be different depending on the operation order.
The Operation Sequence Dialog (or Add-Remove Operation Dialog).
As you add new operations to the procedure sequence, their scheduling settings are set automatically by the program in an intelligent manner: the first operation is assumed that its start time will be determined using a time shift (set by default to 0.0) with respect to the beginning of the batch. In other words, the program assumes that the first operation of a unit procedure (and hence the procedure itself) will start at the beginning of the batch. Every subsequent operation is scheduled to start as soon as the previous operation in the queue is ended; in other words, it uses as reference time the end of the previous operation and as time shift 0.0. All of these settings of course, can be changed. Simply visit the Operations Dialog: Scheduling Tab of each operation in the list and modify accordingly.
Quick View of the Activities under a Unit Procedure
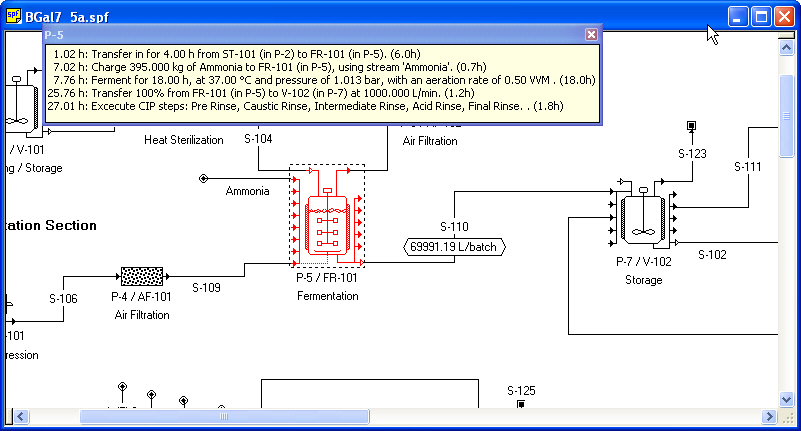
If you move the mouse over a unit procedure’s icon and shift+click right over the icon, you will be presented with a popup window that shows (in brief) a line-by-line description of all the activities that are currently set to execute in that procedure. Quick-view of a unit procedure’s activities using the shift+click mouse action. shows what is being presented after shift+clicking on the fermentation procedure of the b-gal example (supplied with the software).
Quick-view of a unit procedure’s activities using the shift+click mouse action.
The information presented for each operation has three parts:
1. The first part indicates the absolute start time of the operation. Note that this time may either be set by the user directly or it could be calculated indirectly (based on a start time reference operation and a start time shift as set on the Operations Dialog: Scheduling Tab).
2. The second part is a short description of the operation constructed based on the user’s specifications (e.g. amount transferred or charged, temperature settings, etc.) and as shown in theOperations Dialog: Description Tab. The description can also be customized, if necessary, to suit your preferences.
3. Finally, the last part (shown in parenthesis) indicates the duration of the operation.
The fly-over window can be moved anywhere on the screen (by clicking-and-dragging its title bar that displays the name of the procedure); it can be closed down by either clicking on the top-right Cancel button ( ) or simply clicking away from it.
|

|
The units of measure chosen to display the times and operating parameters in the description of each operation are the same as what is used to display the same information on the operation’s i/o simulation dialog. The defaults (for all operations) are set at the process level (see Physical Units Options but they can be customized for a given operation from its i/o simulation dialog .
|
Quick View of a Stream’s Utilization by a Unit Procedure
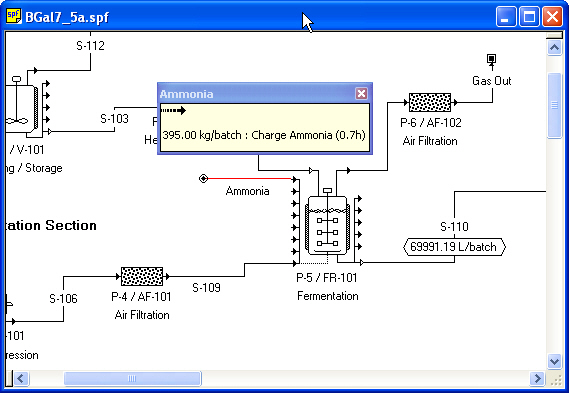
Another related popup window appears when you shift+click on a stream hooked up to a procedure. This time the popup that appears presents information that explains how the stream is being utilized by the unit procedure.
Quick-view of a stream’s utilization using the shift+click mouse action.
For example, the popup above conveys the information that stream “Ammonia” carries 395 kg/batch and it is used by the operation named “Charge Ammonia” whose duration is 3.7h. Such information can be very useful when a unit procedure has several input and/or output ports and it includes a long list of operations in its operation sequence.