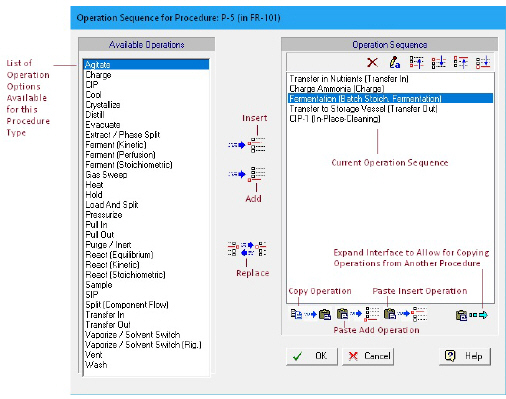
This dialog appears when selecting Add / Remove Operations on the context menu of a unit procedure that is set to operate in batch mode (see Unit Procedure Operating Mode). It allows the user to edit the operation sequence of a unit procedure. Users can add, remove, replace or reorder the operation sequence behind a unit procedure.
On the left, a list will appear with all the operation types available to chose. Note that the list depends on the type of unit procedure (or more precisely, on the type of equipment resource that is hosting the procedure). On the right, the current operation sequence is shown. The list may be empty. When a specific operation type is selected from the left list, you can insert a new copy of that operation type in the current operation sequence by clicking on either the ‘Add’ or the ‘Insert’ button shown in-between the two lists. Clicking on the ‘Add’ button the new operation is added to the end of the current list. Clicking on the ‘Insert’ button the new operation is inserted before the currently selected operation in the sequence.
An existing operation in the sequence can also be replaced with another operation from the list of available operation types in the procedure. Replacing a similar operation e.g a Kinetic Reaction with a Stoichiometric Fermentation operation will transfer certain information such as the reaction scheme, thermal mode and utility data from the existing operation to the operation that is replacing it. Most importantly when replacing any kind of operation even if they have no common properties, all scheduling data (master-slave info, timing references, etc) will be carried over to the new operation.
|
|
If no operations are currently included in the operation sequence, or if no operation is currently selected in the right hand side list, the ‘Insert’ button will not be active. |
You can also use this dialog to edit the current sequence of operations in a unit procedure. All editing of the order (and the names of the operations) is done using the mini toolbar that appears over the right-hand-side list box:

If an operation is already at the top of the sequence the ‘Move to Top’ and the ‘Move Up’ button is inactive. Similarly, if the operations is the tail of the sequence currently, the ‘Move Down’ and ‘Move to Bottom’ buttons will be inactive
Besides moving operations up or down in the list you may also copy an operation from the existing operation sequence and then either paste it by adding it at the end of the list or inserting it right before the currently selected operation in the sequence:

.
|
|
A new operation added by clicking on the ‘Add’ or ‘Insert’ button as described above will have all its property values set to default values and as such it cannot be used in a simulation prior to visiting its i/o simulation dialog and either approving the values or setting the values to levels that are more suitable for your simulation. Essentially, the program needs the user to visit the operation’s i/o dialog and exit by clicking the OK button before it considers the operation ready for simulation. |
.
Sometimes, instead of adding/inserting a fresh copy of an operation that will need to be re-initialized, it is more convenient to add a copy of a pre-existing operation (in another procedure). To accommodate such need, the above dialog can be expanded by clicking on the ‘Expand’ button. Then, the dialog expands to the right and shows as follows:
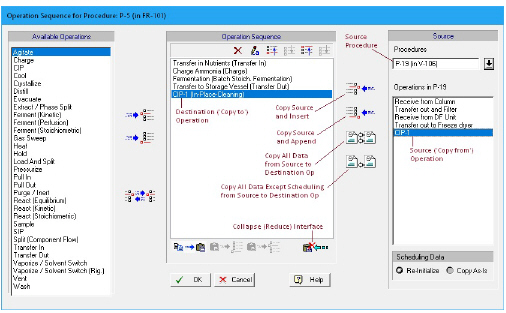
You can now select a procedure from the ‘Source Procedures’ list box and once a procedure is selected, its contained operations are shown below. Then you can select your ‘source operation’. At this point you have four choices as indicated by the four active buttons shown between the list of ‘source operations’ (on the right) and the list of current operations in the procedure sequence (middle).
1. Select an operation in the operation sequence that is of the same type as the source operation and click the ‘Copy All Data’ button. This will not insert a new operation but instead will re-initialized the currently selected operation in the middle list box with all the values of the source operation.
2. Select an operation in the operation sequence that is of the same type as the source operation and click the ‘Copy All Except Scheduling Data’ button. This will not insert a new operation but instead will re-initialized the currently selected operation in the middle listbox with all the values of the source operation with the exception of scheduling data (i.e. reference operation for start time, a master operation for duration, etc.).
3. Click on the ‘Add Copy’ button. This will append to the bottom of the current operation list, an operation that is a clone of the source operation.
4. Click on the ‘Insert Copy’ button. This will inset, right after the currently selected operation in the operation sequence, a clone of the source operation.

