Application Settings
Besides the properties that a process has on its own it also inherits some that are set in association with the application itself and of course, they apply to each of the documents (processes) created with it. Each of the following subsections deals with properties that apply to your preferences on how the application is run and are saved in your user profile (in the Windows Registry). All of the settings that are described in this section can be accessed and set from the Application Settings Dialog.
|

|
Since different users may be running this application under in the same PC, all the application preferences are saved under the particular user’s profile. They will be enforced the next time the application is run by the same user, but they will have no effect on the appearance and behavior of the application when run by another user (on the same PC).
|
Announcements Upon Opening a Process File
Right after the application accesses the file where a process description is kept, it performs a few checks:
● Format Compatibility Check: First off, it makes sure that the process file format is compatible with the currently running application version and build number. Please remember that even though future versions of the application will be backwards compatible with previously created process files, the opposite is not the case. In other words, if a process file was created with an application version/build that is more recent than the running version/build, then the file will not open. Instead you will get an error message.
● Resolution Mismatch Check: Another check performed by the application is to verify if the resolution used when the process drawing was saved is the same as the current resolution (when you open the file). If not, then a necessary conversion is made. For a tips on how to deal with changing resolutions, see Screen Resolution.
● DB-Site Consistency Check: Another check made by the application upon opening a process file pertains only to files that contain mappings (allocations) to objects in the database. These objects (sites, equipment, heat transfer agents, labor, etc.) have values that are supposed to match exactly their database counterparts. As it is possible to edit the database objects independently of the process file that is being opened, it is conceivable that some of the contained object’s database counterparts may have changed (in fact, some may no longer exist altogether!). If such a mismatch is detected, the application will notify you and prompt you to visit the Reconcile with Site DB Dialog.
Since the application will always take a proper action (after the announcement is made) sometimes you may not want to see those announcements coming up after opening a file. This may be especially useful if you are using the COM interface of SuperPro Designer (see COM Library).
Automatic Background Saving of Modified Files
SuperPro Designer provides you protection against losing work due to a unexpected power failure or crash of the application. For as long as there are applications there will always be occasional crashes. Some of these crashes are such that the application can recover and continue to function normally. In these cases, no loss of data happens. However, if a more severe crash occurs, the application may be forced by the operating system to shut down immediately, without allowing the user to have a chance to save any open and modified files. This is where the auto-saving feature comes to the rescue. If the automatic saving is engaged (on) and say, set the auto-save interval to 15 minutes, you are guaranteed to never lose more than 15 minutes worth of work (should a crash occur). When the auto-save feature is on, SuperPro Designer will automatically save backups of all open files into a location under the designated temporary directory path. When the application is first installed the path is taken from the ‘TEMP’ environment variable, but it can later be set to any folder that the user has read-and-write privileges.
|

|
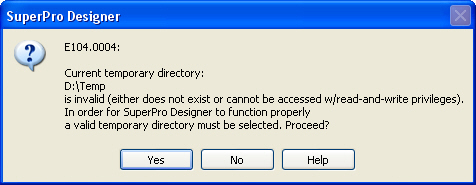
If for whatever reason the designated temporary directory either no longer exists or it is no longer accessible from the user’s running environment, the next time the application starts, it will complain and present the following message
You must click Yes in the above message and then proceed to select a new, valid folder to be used as the application’s temporary directory. If you don’t, and click No, then the application will shut down.
|
If you exit the application normally, all files created by the auto-save process are deleted. However, if a crash occurs, then the next time you start the application you will see a prompt notifying you that there are ‘auto-saved versions’ of files that are dated later than their corresponding last saved version (if any). If you choose to recover these files, then SuperPro Designer will automatically load up all these files for you to view and examine. You may choose later to keep by properly saving in a safe location or discard (i.e. close without saving) these files.
Temporary Directory Location
You must specify a directory (folder) on your PC (locally, not on a network drive) that the application can use to create temporary files (created during its normal operation - especially when generating reports) as well to save the automatically backed up files (see Automatic Background Saving of Modified Files). Make sure that you have full read-and-write privileges in that location. If this folder becomes no longer accessible to the application (for reading and writing) then you will be warned and unless you pick a new valid folder, the application will not start.
Besides using the temporary directory for keeping backup files of your work-in-progress, the application also uses the temporary directory to create temporary files that are needed as part of the report generation process. If the application fails to complete a report successfully, it may leave some of those files behind (un-deleted). These files should be deleted the next time the application starts. If not, you may delete them manually at any time.
Startup Task
As soon as the application starts (after the startup billboards) it will present the Startup Task Dialog, questioning you what you wish to do as a startup task. This setting activates or deactivates this dialog from appearing during application startup. If you deactivate the dialog, then the last option chosen will be performed automatically (if possible). If you later wish to reactivate it and have the application present the Startup Dialog every time it boots up, you need set a flag from the Application Settings Dialog: Miscellaneous tab.
Batch Sheet Forms Folder
When generating the batch sheet for a batch recipe, there are many forms needed: for each operation type, for a procedure description, for component description, etc. All such forms are highly customizable and in case you have several versions of such forms kept in different folders, this selection tells the application where to look for those forms. For more details on the batch sheet, see Batch Sheet Generation.
Workspace Appearance
You can customize the appearance of the application in two basic areas:
a) Choosing a Theme
b) Handling of Multiple Open Process Files (Documents)
Tabbed (Workbook Style) vs. Floating Views
SuperPro Designer provides a multi-document interface. In other words, you don’t need to run multiple instances of the application in order to open multiple files. You can open as many process files as you want from a single running instance of the application. The choice in this box determines how you want to view and manage multiple workspaces (each corresponding to a different file).
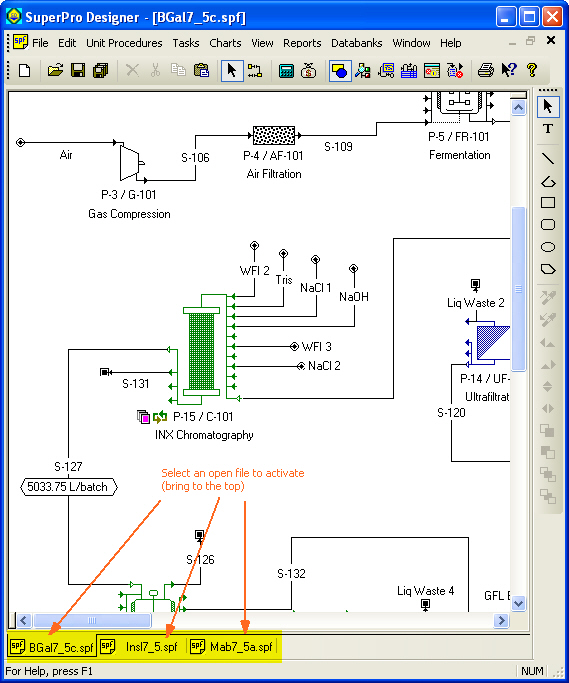
a) If you chose ‘Tabbed’...
Each open file is shown in a window (workspace) that is automatically maximized to occupy all of the available space. When another file is opened, since it now occupies again all of the available space, it will complete overlap the previously open file.
The ‘tabbed’ multi-document interface.
The previously opened files can be accessed by a tab shown at the bottom of the interface:
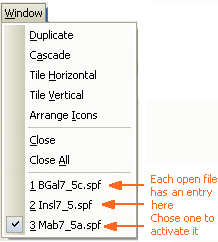
Alternatively, the open files can be accessed by their distinct entry under the menu
The Window menu (from the application’s main menu).
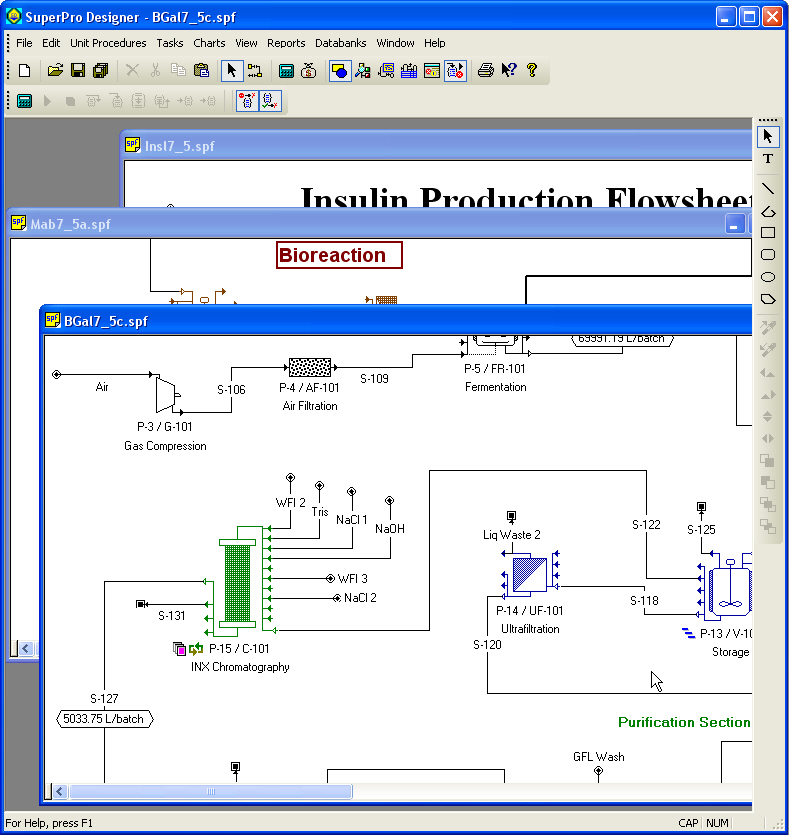
b) If you chose ‘Floating’...
Each process file opened stays in its own workspace that can be sized at will and can be accessed and activated easily by clicking on it.
The ‘floating’ multi-document interface.
Coloring Scheme
Starting with Windows XP, the operating scheme allows you to design (and install) your own personal preference for ‘skins’. A skin determines the appearance of several visual elements of the operating system (such as window title bars, borders, background colors, etc.) The choices in the box, allow you to use such scheme (if available). Pick ‘XP Skin’ for this option. Alternatively, you may chose one of the other three (pre-defined) settings that we have selected for the application.
Database Access UserID & Password
Set the username that is to be used when SuperPro Designer accesses a user-editable database (e.g. the User DB, or the SchedulePro DB – if installed –). The userID may be required to keep track of changes in those databases and to provide you with proper privileges.
Automatic Procedure Name Generation
Every time you insert a new unit procedure in your process description (by selecting a unit procedure type from the menu and then clicking on the flowsheet or copying an existing procedure and then pasting it) the application must create a new unit procedure object and a new equipment resource to be used as the default host. Instead of always prompting you for names for the newly created objects, it uses a scheme to compose unique names for these objects. Of course users can later specify any name of their own choosing (see Edit Procedure Labels Dialog). The same principle applies when a new stream is created and attached to a unit procedure. Finally, when an operation is introduced in a unit procedure, once again, a name needs to be given so that it is unique within that procedure’s sequence. In all those circumstances, the application composes a name by combining a core string (prefix) and a number. The prefix for creating streams is always the same (defaults to ‘S-’ for bulk streams and ‘DS-’ for discrete streams). The prefix for procedures is also fixed (irrespective of the procedure type) and it defaults to ‘P-’. The prefixes used when naming equipment resources and operations depend on their types. For example, when creating the name for a chromatography column (of any type) ‘C-’ will be used (by default), whereas when creating the name for a fermentor, ‘FR-’ will be used. When creating a name for a charge operation ‘CHARGE-’ will be used whereas for a new filtration operation (of any type) ‘FILTER-’ will be used. The full name for all of the above objects is completed by appending a number to the prefix so that the entire name becomes unique. The default starting number for streams and equipment is ‘101’ and for procedures is ‘1’. All of these settings (for prefixes and starting numbers) can be modified (if desired) to better suit your organization’s (or even your own) expectations. Please note that just as is the case for all application settings discussed in this section, the new settings are saved as part of your own profile (in the Windows registry) and will be applied to all process files you work with.