This tab is displayed when you select to show the procedure data dialog of any unit procedure in a batch process flowsheet (i.e., the flowsheet’s process operating mode is ‘Batch’).
1. If the procedure is purely batch (batch by nature), such as the PBA Chromatography procedure, then the procedure’s operating mode can only be set to ‘Batch/Semi-Continuous’ mode (it cannot be switched to ‘Continuous’ mode). This is also true if the procedure is continuous by nature (e.g., Continuous Stoichiometric Reaction in a CSTR) and its operation sequence has more than one operations in it. Then, you must visit the Add/Remove Operations... dialog and remove all the operations but one, and then come back to this dialog to switch the operation mode to ‘Continuous’.
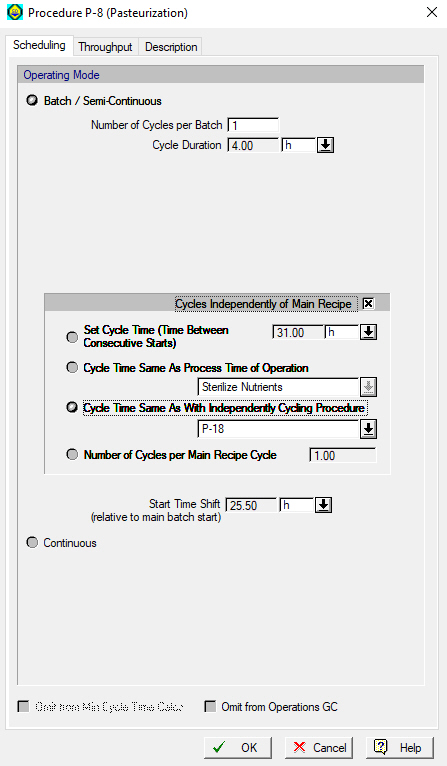
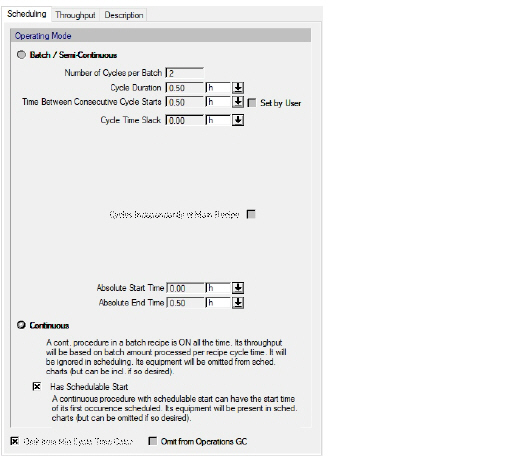
2. When the procedure is in ‘Batch/Semi Continuous’ mode, you may view or change the ‘Number of Cycles per Batch’ (which is equal to one, by default). A cycle for a unit procedure in batch mode is a completed sequence of operations (as dictated in the operation queue; for more details, see Procedure Cycle and Cycle Duration). If you set the number of cycles in this dialog to anything larger than 1, it implies that the specified sequence of operations is executed that many times (per process batch) to complete the unit procedure. If a batch procedure is set to operate in a continuous process (i.e., the procedure is in ‘Batch/Semi Continuous’ mode and the flowsheet’s operating mode is ‘Continuous’), then:
- the number of cycles cannot be set (it’s always assumed to be 1), and
- the Holdup Time controls appear; for more details, see Procedure Data Dialog: Scheduling Tab (Continuous Process).
3. The ‘Time Between Consecutive Cycle Starts’ and ‘Cycle Time Slack’ fields appear when the procedure’s number of cycles per batch is greater than one. The time between consecutive cycle starts specifies the time between consecutive starts of the procedure (per process batch). The cycle time slack is the difference between the time between consecutive cycle starts and cycle duration. By default, the time between consecutive cycle starts is assumed equal to the cycle duration of the procedure and the cycle time slack is zero. If the ‘Set by User’ option next to the time between consecutive cycle starts is checked, then the user may edit the time between consecutive cycle starts and set it to be larger or smaller than the cycle duration. If the time between consecutive cycle starts is smaller than the cycle duration, then the consecutive cycles or executions of the sequence of operations in the procedure overlap (i.e., the cycle time slack is negative), which will cause an equipment sharing violation. In this case, the main equipment sharing conflicts may be resolved by setting extra sets of equipment in staggered mode (see Staggered Mode), but auxiliary equipment sharing conflicts can only be resolved by making the time between consecutive cycle starts greater than or equal to the cycle duration. If the time between consecutive cycle starts is smaller than the cycle duration, the ‘Extra Sets Required in Stagger Mode to Meet Cycle Time’ is displayed. This is the minimum number of extra sets of equipment in staggered mode required to resolve the main equipment sharing conflicts. When you click OK to close the procedure data dialog, the program offers to set the staggered equipment option on the equipment data dialog to ‘ON’ and set the extra sets of staggered equipment equal to the calculated minimum value, automatically.
4. If the ‘Cycles Independently of Main Recipe’ flag is checked, then the ‘Time Between Consecutive Starts’ (aka, Cycle Cycle Time) and the ‘Number of Cycles per Main Recipe Cycle’ fields appear, where you can set the time between consecutive procedure starts or the number of cycles per main recipe cycle time. The ‘Start Time Shift’ is also shown but it cannot be edited by the user, as it is calculated by the start of the first operation in the procedure. For an example of how to use independently cycling procedures, please refer to the Lysine example which ships with SuperPro Designer, as well as its associated MS Word explanation. See also Procedure Cycle and Cycle Duration.
5. The cycle duration, cycle time slack, absolute start time and absolute end time of the procedure are only shown for display purposes and cannot be set by the user. Note that absolute start time and absolute end time are shown only when the ‘Cycles Independently of Main Recipe’ flag is not checked. The units of time shown (sec, h, day, etc.) follow the user’s choice as set by the Physical Units Options: Time Tab (accessed by clicking Preferences } Physical Units Options on the flowsheet’s right-click menu).
6. The’ Omit from Min Cycle Time Calcs’ option is checked if the procedure’s hosting equipment resource has been excluded from scheduling calculations as set from Equipment Data Dialog: Scheduling Tab.
7. The ‘Omit from Operations GC’ option if checked will force this unit procedure (and all its contained operations) to not appear on the Gantt Charts. The operations in this procedure can still be used as references for start / end times of other operations in other procedures. By default all batch mode unit procedures and their contained operations, appear on the Gantt chart. However, there may be occasionally a need to hide a particular procedure that appears on the flowsheet for mass & energy simulation purposes only (e.g. an in-line intelligent mixer) so that it doesn’t clutter the chart. If you set the unit procedure’s mode as ‘Continuous’, then this unit procedure (and its contained operation) will no longer appear on any Gantt charts and the hosting equipment resource will not appear in the Equipment Occupancy Chart.
8. A continuous procedure in a batch process can be given a specific start time by clicking on the ‘Has Schedulable Start’ check-box (see following image). This means that the procedure can have the start time of its first occurrence scheduled and its hosting equipment will be present in all scheduling charts unless omitted. Again when this procedure starts can be adjusted from the Operations Dialog: Scheduling Tab.
See Also:
● Procedure Data Dialog: Scheduling Tab (Continuous Process)