The Process File
When working on a process simulation many and diverse pieces of information need to be collected and integrated appropriately in order to produce a successful outcome. Raw materials (ingredients) need to be registered; unit procedures with their contained operations need to be created and initialized at the appropriate operating conditions; streams and their connectivity must be established to convey the transferring of material from one step to another; equipment (main and auxiliary) must be established that will host the processing steps; utilities in the form of heating and cooling agents must be introduced in order to accomplish any heating and/or cooling assignments; in the case of a batch simulation, the timing of all the actions must also be specified and recorded. Information on the participating elements in a process may originate from the System database, the User database or just be created for the purposes of the simulation case alone. All this information is kept in a process file. Besides the exact description of the process participants, a process file also contains the user’s choices for many different aspects of the simulation cycle: the visual appearance of the graphical user interface, user’s preferences for units in reports, charts, etc., just to name a few. All this information is kept inside the file and that is reason why these process files tend to grow very rapidly. By convention, all SuperPro Designer’s files have the ‘.spf’ extension, and all ‘EnviroPro Designer’ files have the ‘.epf’ extension.
|

|
Just about every possible choice you can make while working with the application is either saved in your user profile (registry), see Application Settings or it is already saved as part of your process file in order to facilitate your next change and/or adjustment to the process. The only piece of information that is NOT saved and cannot be customized to fit your preferences is the default values used to initialize the unit operations, main equipment resources or economic analysis and evaluation. These values are hard wired and may or may not be appropriate for your area of simulation. In a future version, users will be possible to create groups of settings that may be appropriate for their own industry (domain) and employ the appropriate set of defaults before starting a new simulation in that domain. To circumvent this limitation currently, see Customizing Default Settings for a Domain of Applications
|
Since all the information related with a process is contained in a single file, keeping a safe copy of a process file is very important. Keeping backup copies of files on other media is also a good idea. To copy all the information contained in a process, all you have to do is copy a single file, the process file. You should also develop the habit of saving any incremental changes you have made to the process you are working on fairly often. In fact, an even better suggestion is to keep several versions of your process file, as it progresses from its inception stage to completion, under different file names. There are several compelling reasons for that. First, it allows you to review the evolutionary steps taken during the design of a process, and possibly revisit them later and entertain new options at any given phase of the design. Furthermore, it protects you against the possibility of a corrupted process file that could render all your work unreadable by the program. We have made every effort to eliminate all those unfortunate conditions that may corrupt a process file or lead a program to a crash, but as it is inevitably the case, there will always be some bugs that escape our testing. Some other times these situations might arise due to interactions with other programs running at that time on your machine, so it is impossible to predict. The best protection against such situations is to always be conservative and save several versions of your process file. Later in this chapter, we will propose a file system that allows you to keep all these versions organized within a project or across several projects.
Customizing Default Settings for a Domain of Applications
The current version of the software uses a single set of costing and economic evaluation factors derived from data that primarily apply to relatively large chemical and biochemical plants. The default factors may be substantially off for small plants that produce high value products or for very large bio/chemical plants that produce commodity products. To store your own factors for different types of plants, you might consider creating Seed (Template) Processes and use them as starting points whenever you wish to analyze a new process that resembles one of the template processes. To make sure that you can keep all these files around in an organized manner, you may consider following the paradigm proposed in the next section (see section 13.5). Future versions of SuperPro Designer will support generation of settings file for storing default values of multipliers and settings.
|

|
For cost analysis purposes, an alternative to setting files is to take advantage of the database capabilities of SuperPro Designer. Database sites store information on economic evaluation multipliers and other cost data and when a flowsheet section is allocated to a database site, it uses by default the factors of the site. Thus, a database site may function as a settings file. For more information on how to take advantage of the database capabilities for cost analysis, please consult the ‘SynPharmDB’ read-me file in the ‘Examples \ SynPharm’ directory of SuperPro Designer.
|
Working on a Long Term Project
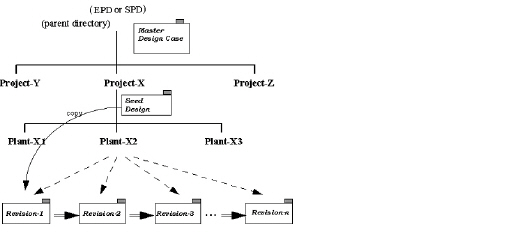
As you probably need to have more than one alternative designs per project, and for each design, several revisions, this all adds up to many files. In order to keep all these files in an organized manner the scheme shown below
Organizing SuperPro Designer process files for a large project.
First of all, you need to keep all your files under a master subdirectory that bears the name of the software you are using (SuperPro Designer or EnviroPro Designer) and the version number. This is very important in case you later upgrade to a newer version or to SuperPro Designer, you need to keep the files separate. Under the master directory is a good place to keep your Master Process file. As you start a new project, you should create a new directory with a name bearing the name of the project. Chances are that you are going to be working on several projects and you definitely need to keep the files for each project separate. As you focus on a specific project (e.g., Project-X), use that directory as the container of a Seed Process file. As you will probably have to deal with more than one alternative designs for each project (named ‘Plant-X1’, ‘Plant-X2’, etc. in the figure above), it is suggested that you create a separate subdirectory for each. You can start each alternative design by copying the entire seed process file into the corresponding subdirectory. Proceed by gradually adding the processing elements that compose your suggested configuration, making sure you save the design under several names (labeled ‘Revision-1’, ‘Revision-2’, etc. in the figure above) before you have added all the steps in your final revision. It is a good practice to keep ample comments as you progress from one revision to another documenting some of your decisions. Use the “Comments’ field of the Flowsheet Attributes dialog, as the storage area for all such explanations.
Automatic Versioning (Archiving) of the Process File
The program, in an attempt to protect you against inadvertently losing your current process file, it automatically creates a set of backup (archive) files every time you save (} option from the main menu) any changes you made in your process and attempt to overwrite the previous version that already existed on the disk. The program will always maintain three versions for every process file:
1. Current (latest) Version: myfile.spf (for SuperPro) or myfile.epf (for EnviroPro)
2. Previously Saved Version: filename.sp~ or filename.ep~
3. Oldest Version: filename.s~~ or filename.e~~
Every time you save a process file by selecting } of the main menu or by clicking on the Save button ( ) or the Save All button (
 ) of the main toolbar, all three files are updated: the oldest version is deleted, the previous version is renamed as filename.s~~ (or filename.e~~), the existing version is renamed as filename.sp~ (or filename.ep~) and finally the version you have just completed is saved under the filename.spf (or filename.epf) you have provided.
Protected and Password Process Files
In order to prevent unwanted changes in a process file as well as facilitate various sharing scenarios between individual users, the program allows you to create versions of a process file with limited privileges. Specifically, there are two types of limited-access process files that can be created from a master process file:
● View and modify (Level 1, or L1 protection) and
● View only (Level 2, or L2 protection)
L1 or View and modify process files allow the user to perform every action just like in an unprotected file (e.g., alter parameters, run M&E balances, create reports and charts, etc.) except saving the file.
L2 or View only files just allow the user to run M&E balances, visit dialogs (for viewing purposes only) as well as create reports and charts but not even change ‘live’ any values (just to experiment and see the consequences). In other words, L2 protection prevents not only saved modifications to a file, but ‘live’ modifications as well.
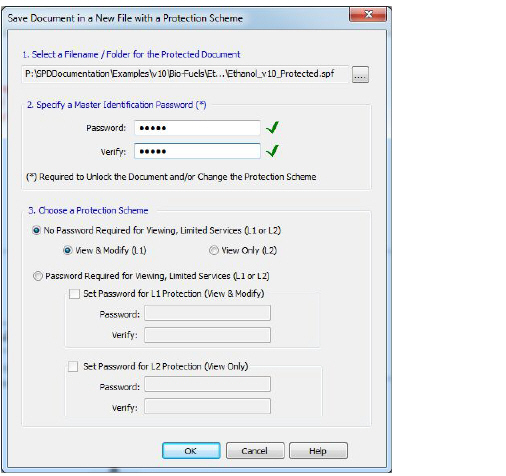
If you don’t want to allow a file to even be open and viewed to the prying eyes of others, you can built into them a password protection. To create a password protected process file select }As soon as a user attempts to open password protected files, the program will prompt the user for the password and will refuse to proceed (open it) unless the password matches the built-in password. Once the file opens, it will still demonstrate either a L1 or L2 protection as designed.
To create a password protected file, the first step is to select a path and filename for the protected file and specify a master password which should be at least 3 characters long. The master password is required in order to remove the protection and save the process file in its original form.
Subsequently, you must specify whether a password will be required to open the protected file. If you chose the No Password Required... option then you can set only one protection level, either L1 or L2, by checking the corresponding radio button. On the other hand, if the password requirement option is enabled, the protected file can either be L1-protected or L2-protected depending on the password provided by the user upon opening. Clearly, if the corresponding checkbox is not checked for either the L1 or L2 protection, that level will not be available for the protected file.