Procedure States
A unit procedure is assumed to be hosted by an equipment resource (the only exception from this rule are the transportation procedures that do not assume a host equipment). Unlike a continuous, steady-state operating process where all process steps require dedicated equipment resources 100% of the time, in a batch process, it is possible to utilize the same equipment resource (e.g. some storage unit) in distinct steps (procedures) of the process that happen at different time periods during the execution of a batch. Equipment sharing can be captured by SuperPro Designer, see Selection & Sharing. Most equipment are not pass-through (in nature) and therefore hold material during the sequence of execution of the several operations in a procedure. The equipment contents during the execution of a procedure are called (in SuperPro Designer’ s terminology) Procedure States (or in some dialogs you may find the initials ‘PS’ for short). Then again, some equipment (e.g. a Dead-End Filter) do not have material holding capacity and therefore do not have any procedure states. Also, having or not procedure states may depend on just on the equipment itself, but how the procedure is being run (ie. in batch mode or in continuous mode). For instance, a Stirred Reactor Vessel, if utilized as part of a ‘Batch Vessel Procedure’ has procedure contents before and after every operation defined in its operation sequence. If, though, the same equipment is utilized as part of a CSTR continuous reaction, then the procedure does not feature any states.
Procedure State Physical State Calculation Options
Material in procedure states is considered to be in either vapor or liquid/solid state. For each procedure state, SuperPro Designer calculates the Physical State (PS) of each component by either a simplified component-specific set of criteria (i.e., the Shortcut PS Toolbox) or by an elaborate VLE Model (i.e., the Rigorous PS Toolbox). A detailed description of the physical state calculation options is given in Physical State Calculation Options.
|

|
The physical state (vapor or liquid) of a procedure state is indicated by the vapor fractions of its components. The component vapor fraction (i.e., the moles of the component in the vapor phase divided by the total moles of the component) must not be confused with the molar fraction of the component in the vapor phase (i.e., the moles of the component in the vapor phase, divided by the total moles of all components in the vapor phase).
|
By default, every procedure state inherits the default PS calculation options of its associated unit procedure. It is possible to deviate from these default settings in one of the following ways:
1. Modify the assigned PS Toolbox. While the Shortcut PS Toolbox offers a quick way to determine the physical state of a procedure state, the Rigorous PS Toolbox calculates the distribution of components in the vapor and liquid/solid phase in a more realistic manner. As a rule of thumb, the Shortcut Toolbox should be used when the accuracy of physical state calculations is not a primary concern or when no change of phase occurs in the process.
2. Modify the options of the assigned toolbox. For example, it may be necessary to change the Shortcut PS Toolbox V/L split criterion of a component (e.g., ammonia) from the default Normal Boiling Point to Liquid/Solid Only as it may be known that, at the conditions of the procedure state, all ammonia present in the mixture is dissolved in the liquid phase. On the other hand, given a procedure state that uses the Rigorous PS Toolbox (e.g. a mixture of hydrocarbons for which the binary interaction coefficients are readily available), an EOS model (e.g., the Peng-Robinson or the SRK) is best suited than the default Raoult’s law.
Customizing the PS Calculation Options Of A Procedure State
1. While in select mode (i.e., the  button is pressed on the main toolbar), right-click on the procedure icon and select .
2. Each tab in this dialog corresponds to an operation in the procedure. The options in each tab apply to the calculation of the PS after the corresponding operation. Visit the respective tab of the procedure state whose PS calculation options you would like to change.
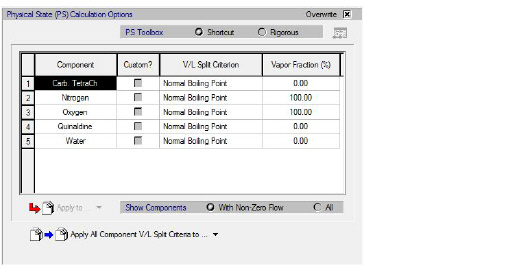
3. Check the Overwrite checkbox in the Physical State (PS) Calculation Options frame (see Selection between the Shortcut and the Rigorous Toolbox for the calculation of the stream’s physical state.).
4. Select between the Shortcut or Rigorous PS Toolbox option.
Selection between the Shortcut and the Rigorous Toolbox for the calculation of the stream’s physical state.
|

|
For each procedure state (a.k.a. equipment content), the selection between the Shortcut vs Rigorous PS Toolbox as well as the comprehensive PS Toolbox options are, by default, dictated by their associated procedure. This means that any change to the procedure’s PS calculation options will be automatically propagated to all of its procedure states (as well as all output streams of that procedure). Checking the Overwrite option allows the procedure state to differentiate its behavior and adopt a different set of PS calculation options from its associated procedure. As a consequence, from that point onwards, any change to the PS calculation options of the procedure will not be propagated to that procedure state.
|
1. While in select mode, right-click on the procedure icon and select
2. Visit the respective tab of the procedure state whose PS calculation options you would like to change. Please remember that each tab represents the state of the procedure (a.k.a., equipment contents) right after the operation mentioned at the top of the tab.
3. Check the Overwrite checkbox in the Physical State (PS) Calculation Options frame.
4. Make sure the Shortcut Toolbox option is selected.
5. Check the checkbox for the specific component you wish to change the V/L split criterion (see The Physical State calculation options tab for a bulk stream.).
6. From the V/L Split Criterion drop-down list, select the criterion of choice (see The Shortcut Physical State Calculation Toolbox for more details)..
The Physical State calculation options tab for a bulk stream.
By selecting a component with a customized V/L split criterion and pressing the  button, the following options become available:
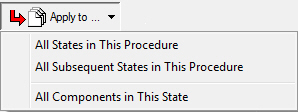
● Applies the selected component’s V/L Split criterion to all components in all procedure states in this procedure.
● Applies the selected component’s V/L Split criterion to all components in all subsequent procedure states in this procedure. This option is convenient in cases where after a given operation and onward in this unit procedure, the conditions become such that a given component should be considered as ‘Liquid/Solid Only’.
● Applies the selected component’s V/L Split criterion to the rest of the components in this procedure state.
Furthermore, by clicking the  button, the following options become available:
● Applies the V/L split criteria of this procedure state as a set, to every other procedure state in this procedure.
● Applies V/L split criteria of this procedure state as a set, to all subsequent procedure states in this procedure.
|

|
When applying an entire set of V/L split criteria to other procedure states, only the settings of displayed components in each procedure state will be applied.
|
●
|

|
By alternating between the Show Components With Non-Zero Flow and All options, you can prevent the components that are not actually present in a procedure state from being displayed.
|
●
1. While in select mode, right-click on the procedure icon and select .
2. Visit the respective tab of the procedure state whose PS calculation options you would like to change. Please remember that each tab represents the state of the procedure (a.k.a., equipment contents) right after the operation mentioned at the top of the tab.
3. Check the Overwrite checkbox in the Physical State (PS) Calculation Options frame.
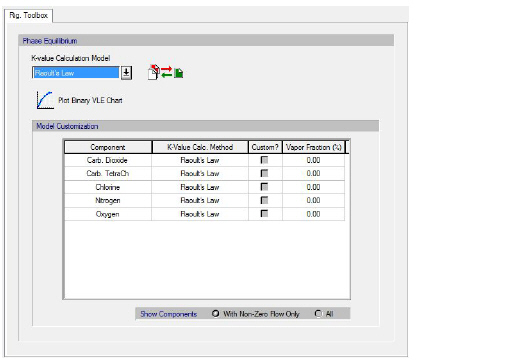
4. Make sure the Rigorous Toolbox option is selected.
5. Click on the Edit Rigorous Toolbox Options button  .
.
6. In the Rig. Toolbox dialog that appears (The Rigorous Toolbox dialog.), specify the desired VLE model from the K-value calculation model drop-down list (see The Rigorous Physical State Calculation Toolbox for more details).
The Rigorous Toolbox dialog.
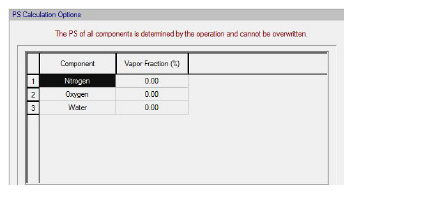
Procedure States with Locked PS Calculation Options
Certain operations have their own unique way to specify the PS of components. For example, in drying operations (e.g., Cone Drying, Tray Drying, Granulation, Cake Drying, etc.) the PS of components is determined by an evaporation percentage specified by the user. This specification overrides the rules of the PS calculation toolboxes and therefore, the associated procedure states of these operations will have their PS calculation options locked (which means they cannot be overwritten), as illustrated in the figure below.
|

|
If a procedure state has its PS calculation options locked (due to the nature of the preceding operation), and the immediately following operation(s) do not bring material in or significantly change the temperature and pressure of the equipment contents (such as Transfer Out, Hold or Agitate) the states after those operations will also be displayed with the PS calculation option locked as well.
|
Procedure state locked PS calculation options.
Procedure State Density Calculation Options
For each procedure state, SuperPro Designer calculates the individual densities of the liquid/solid and vapor phase (see Density Calculation Options) as well as the total density of the procedure state. By default, every procedure state is initialized with the density calculation options of the procedure that they belong. Of course, all such procedure density modeling options originally are inherited from the settings chosen for the entire process. Users may intervene at any point and engage a different model in the calculation of phase densities. The can change the liquid/solid and/or vapor density model at the procedure level by selecting from that procedure’s command menu.
It is possible to deviate from the default settings for the calculation of density in one of the following ways:
1. Modify the liquid/solid density calculation options
2. Modify the vapor density calculation options
|

|
When the ‘Overwrite’ check box is checked, the density calculation options for that procedure (and all its states) become independent of the respective options of the process file. As a consequence, possible changes in the density options of the process file will not be propagated to the procedure states.
|
3.
In the ensuing dialog, after checking the ‘Overwrite’ box for either the Liquid/Solid Phase or the Vapor Phase (or both) the user can enforce a new model for that phase. Any changes made there will automatically be applied to all contained procedure states. In a similar way, a user may chose to part with the procedure density calculation options at a specific procedure state. This can be done by selecting the from the procedure’s command menu. Then, navigate to the desired procedure state and make your new choices after the ‘Overwrite’ check box is marked where appropriate. Note that each tab represents the procedure state (a.k.a. equipment contents) after the operation named at the top of the tab is executed. Once the ‘Overwrite’ box is checked, any future changes in the procedure’s settings will not be propagated to that state.
Customizing the Density Calculation Options Of Procedure States
1. While in select mode, right-click on the procedure icon and select .
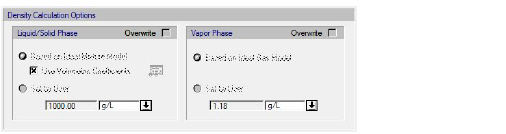
2. Check the respective Overwrite checkbox for the Liquid/Solid or Vapor Density (The procedure state’s density options.).
3. Make the desired changes regarding user-set density values, volumetric coefficients, etc.
The procedure state’s density options.
Procedure States with Locked Density Calculation Options
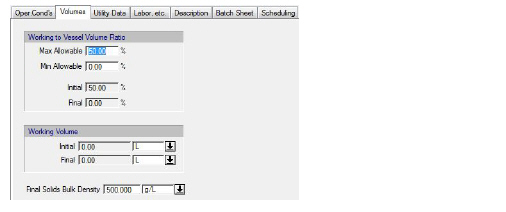
Certain operations have their own unique way to specify the density of the liquid phase. For example, in some drying operations (i.e., Cone Drying, Sphere Drying and Granulation) as well as in operations that have to do with the transfer of solids, the density of the liquid/solid phase is explicitly specified by the final bulk solids density:
Specification of the final Bulk Solids density.
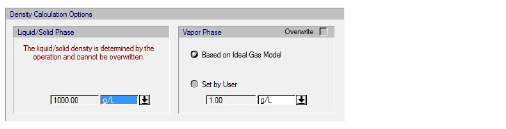
The associated procedure states of these operations will have their liquid density calculation options locked (which means they cannot be overwritten), as illustrated in the figure below.
Procedure state locked density calculation options.