Exporting Flowsheet & Chart Drawings
SuperPro Designer is an invaluable tool in representing a process (especially in its early stages) and evaluating several alternatives by performing ‘what-if’ experiments. Almost always, an engineer will eventually have to collect the results of such experiments and put them together in a report that will be submitted to his/her colleagues or supervisor. The application allows you to integrate all the drawings you have created and the results that you have generated very easily into your reports. Also, if the scope of the process simulation was only for a preliminary analysis and, after approval, a more detailed process drawing is expected to be done using more process drawing tools (such as AutoCAD®) it is possible to export the flowsheet drawing to an AutoCAD®-compatible format so that it can be used as a seed for the further process enhancements. In this section, you will find out how you can:
b) Incorporate the entire flowsheet drawing or sections of it into other programs (see Exporting Process Flowsheet Drawing).
2. Incroporate charts (as pictures) generated by the software into your reports (see Exporting a Chart Drawing).
Exporting Process Flowsheet Drawing
There are two possible ways that you can export flowsheet drawings and later incorporate them into another program:
2. Using the clipboard (aka, cutting-and-pasting).
1. Using a file to store the picture and later import it from the other application.
Exporting the Process Flowsheet Using the Clipboard
This is probably the most commonly used method for sharing either the entire picture of a flowsheet, or just a section of the flowsheet drawing with another application.
3. Make sure that you are in select mode (the  button is pressed o the main toolbar). Click-and-drag the mouse to create a selection rectangle large enough to include all the elements that you wish to be included. Shift+Click to include (or remove) more elements (one-by-one). If the entire flowsheet needs to be copied, you may choose (or Ctrl+A as a shortcut) in order to select the flowsheet in its entirety.
2. Copy the selected parts to the clipboard: select from the application’s main menu (or Ctrl+C as a shortcut, or click on the Copy button ( ) of the main toolbar.
1. Paste the clipboard contents into the receiving application: bring up the program where you want to include the drawings (e.g., MS-Word®) and open the document (report) that you wish to include the flowsheet drawing. Find the menu. You will have two choices:
a) Select (or type Ctrl+V or Ctrl+Ins, or click on the paste button ( )
)
b) Select l. The dialog shown in The ‘Paste Special’ dialog. will appear (actual contents of the list in your environment may be different). Notice that you have two decisions to make in this dialog. The first decision refers to the nature of the pasted object as it will continue to exist in the receiving application. Your choices are displayed in the listbox:
(a) ‘SuperPro Designer Flowsheet Object’, or
(b) ‘Picture’
If you select ‘Picture’, then the pasted object will be treated as a plain picture and most word processors (or spreadsheets) will allow you edit the picture locally, in case you need to add and/or remove anything to it (e.g. comments or highlights). If you select ‘SuperPro Designer Flowsheet Object’, then you can only edit the picture only if you (or the viewer of the report) has a copy of SuperPro Designer installed. will be able to edit the contents of the pasted picture. If you choose to include the picture as a ‘SuperPro Designer Flowsheet Object’ then you can either have the picture:
(a) Pasted, or
(b) Paste-Linked
into the receiving document. There is a significant difference between options (a) or (b) above. Choosing (b) implies that there will continue to be a ´live´ connection (sometimes referred to as ´hot-connection´) between the receiving document and the source of the pasted image (SuperPro Designer’s process file). If you modify the contents of the source file, then the image in the receiving document will change as well to reflect the most current version of the process file. However, this behavior sometimes may not what you want. Instead you may want to insert a ´frozen´ picture of the design case as is now, and not have it change later. In this case you must choose (a) (i.e., simple pasting).The disadvantage of a live-link (‘Paste-Link’) is that the viewer of the report must have access to the original process (.spf) file and they must also have a copy of the application installed in order to view the report.
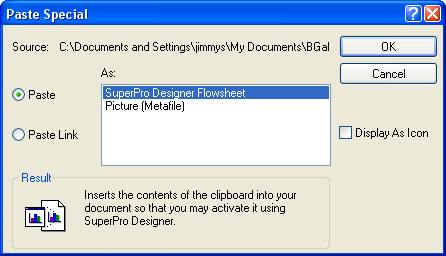
The ‘Paste Special’ dialog.
|

|
The option to include the copied flowsheet picture as a ‘SuperPro Designer Flowsheet Object’ will not be there if the clipboard only holds a partial description of the original flowsheet. You must have placed the entire flowsheet on the clipboard in order to be able to paste (or paste-link it) as a ‘SuperPro Designer Flowsheet Object’.
|
Pasting into Another SuperPro Designer document
It is perfectly legal to paste the flowsheet (or its parts) placed into the clipboard into another SuperPro Designer process flowsheet. When this is done, the application will insert all the copied procedures and streams into the destination flowsheet. There are many actions that the application will take in the background when this happens and that users should be aware:
3. Before the insertion of the copied unit procedures and streams, the application will check to verify that all components and mixtures present in the source document (where the flowsheet parts where copied from) are also present in the destination flowsheet. If that is not the case, then before the insertion of the copied objects is made, the list of registered components and mixtures will be automatically expanded to include the missing items (components and mixtures that existed in the source document but not in the destination document). Make sure that when you paste the flowsheet, the original source document is still opened within SuperPro Designer. The application will identify the existence of such ingredients by their local names. If you have inadvertently named a different component (or mixture) in the destination flowsheet with the same local name as the source flowsheet, the copied information will not be as you expected. That is another reason why you should choose the local names of components and mixtures very carefully during their registration.
2. The same cross-registration of entities will happen for any heat transfer agents, labor types, power types, or any other resources used in the source flowsheet but not in the destination flowsheet. Once again, for resources that were locally introduced in the source and destination flowsheets (i.e. they were not copied from the databanks) there is a possibility of a mix-up, if the same name has been chosen to represent to different resources.
2. All scheduling references of operations will be reset to the default choice: for the lead operation the reference will be reset with respect to the beginning of the batch, and for the follow-up operations in a procedure, their scheduling reference will be with respect to the end of the previous operation in the queue. All external references will be eliminated as it cannot be guaranteed that such operations are part of the copied set. The lead/lag values (time shift) will be left as is.
|

|
Since several alteration can be made during the pasting of a flowsheet into another flowsheet, it is not recommended practice to build a large process in pieces and then copy-and-paste the parts together to represent the entire process. The two acceptable alternatives would be to: (a) gradually keep adding to the process file all elements till the entire process is represented or (b) build the different parts of the process in different process files and use the auto-initialization of streams (see Auto-Initialization of Input Streams) or equipment contents (see Initial Equipment Contents: Initialization Options Dialog) feature to connect the files together.
|
Exporting The Process Flowsheet in a Metafile (wmf)
Most graphics applications and word processing applications allow you to insert in their document a picture as contained in a file. By far, the most popular graphics format in the Windows® world is the “Windows Metafile” format, or “wmf” format for short. It is very popular because it allows graphics to be saved and later inserted within a frame of a given size with minimal distortion of picture quality. Furthermore, several of the leading word processing and graphics applications, can recognize graphic elements in a “wmf” graphic and allow users to edit the picture using their own picture editor. MS-Word®, for example, has its own metafile picture editor. Therefore, you can insert a picture into MS-Word® from a “wmf” file, resize it, edit it and later save it again as part of the MS-Word® document. SuperPro Designer allows you to export the drawing of a process flowsheet in a Windows Metafile format.
1. Select the part that you wish to copy (or the whole flowsheet)
Make sure that you are in select mode (the  button is pressed o the main toolbar). Click-and-drag the mouse to create a selection rectangle large enough to include all the elements that you wish to be included. Shift+Click to include (or remove) more elements (one-by-one). If the entire flowsheet needs to be copied, you may choose (or Ctrl+A as a shortcut) in order to select the flowsheet in its entirety.
3. Export the selected items into a ‘wmf’ file
Select from the application’s main menu. A file selection dialog will appear, prompting you to select a location (folder) and a name to be used. Type in the filename that you wish to contain the description of the flowsheet in “wmf” format. By convention, all such files should have a “.wmf” extension. The file need not already exist. In fact, if the program discovers that a previous file exist with the same name and in the same location on your hard disk, it will ask for your permission to overwrite it.
Import the ‘wmf’ picture in the receiving document.
The actual menu selection may differ (depending on the receiving application). Typically there will be a menu option (for the exact menu option please consult your software’s manual or online help). Select the file as set by the previous step (2).
|

|
If no items (procedures, streams, visual objects, etc.) are selected in your flowsheet, the command will be shown as disabled.
|
Exporting the Process Flowsheet as a (dxf) AutoCAD® file
AutoCAD® is a popular detailed engineering software package, used by several companies to produce detailed Process & Instrumentation (P&I) Diagrams. Even though the flowsheet representation in SuperPro Designer is usually not detailed enough to qualify directly as a P&I diagram, it can be used as a starting seed for creating the detailed P&I diagram for a process. Consequently, some users will find it very useful the fact that they can export the entire flowsheet or parts of it into a file that is in DXF format (that is the vector graphics format used by AutoCAD®). Besides AutoCAD®, several other graphics packages (like Visio®, CorelDraw®, etc.) will allow you to import graphics in this format and later convert the drawing into their own native format.
Select the part that you wish to copy (or the whole flowsheet)
Make sure that you are in select mode (the  button is pressed o the main toolbar). Click-and-drag the mouse to create a selection rectangle large enough to include all the elements that you wish to be included. Shift+Click to include (or remove) more elements (one-by-one). If the entire flowsheet needs to be copied, you may choose (or Ctrl+A as a shortcut) in order to select the flowsheet in its entirety.
Export the selected items into a ‘dxf’ file
Select ®from the application’s main menu. A file selection dialog will appear, prompting you to select a location (folder) and a name to be used. Type in the filename that you wish to contain the description of the flowsheet in “dxf” format. By convention, all such files should have a “dxf” extension. The file need not already exist. In fact, if the program discovers that a previous file exists with the same name and in the same location on your hard disk, it will ask for your permission to overwrite it.
Import the drawing from AutoCAD® or other ‘dxf’ friendly software.
Typically there will be a menu that will allow you to open a ‘.dxf’ file. Make sure that in the file format displayed ‘*.dxf’ or ‘*.*’ is selected. Locate the file as specified in step (2) above and open it.
|

|
If no items (procedures, streams, visual objects, etc.) are selected in your flowsheet, the command will be shown as disabled.
|
|

|
Only the drawing of the flowsheet is exported in the DXF file. None of the data behind the icons (unit procedures, operations, equipment or streams) are exported. Also, remember that when SuperPro Designer drawings are exported into ‘dxf’ format, the images are converted to a set of elemental shapes (lines etc.) but they are not grouped into compound objects. This should be done from the receiving application (AutoCAD®, CorelDraw®, etc.) at a later stage.
|
Exporting a Chart Drawing
You can export any chart (as a picture) from SuperPro Designer into another Windows® application (e.g. a word processor). The export can happen with one of two ways:
Using the clipboard (aka, cutting-and-pasting)
Using a file to store the picture and later import it from the other application.
Generate a chart of your choice (the equipment occupancy chart, the operations gantt chart, any resource consumption chart, etc.)
Copy the chart into the clipboard
From the chart’s command (context) menu, select . The chart’s context menu appears when your right-click on an unoccupied area of the chart.
Paste the chart in the destination document
Open the document where you wish to paste the chart (MS-Word® document, or MS-Excel® spreadsheet, etc.) and select from the application’s main menu (usually, Ctrl+V can be used as a shortcut). Note that and the options available to OLE items does not apply to charts; they can only be pasted as pictures and not paste-linked as OLE objects.
Generate a chart of your choice (the equipment occupancy chart, the operations gantt chart, any resource consumption chart, etc.).
Save the file into a ‘.wmf’ file
From the chart’s command (context) menu, select . The chart’s context menu appears when your right-click on an unoccupied area of the chart. This will bring up a typical file selection dialog from where you can specify the location (folder) and file name to be used for the storage of the chart as a Windows Metafile. By convention, all such files should have a “.wmf” extension. The file need not already exist. In fact, if the program discovers that a previous file exist with the same name and in the same location on your hard disk, it will ask for your permission to overwrite it
Import the ‘wmf’ chart (as a picture) in the receiving document.
The actual menu selection may differ (depending on the receiving application). Typically there will be a menu option (for the exact menu option please consult your software’s manual or online help). Select the file as set by the previous step (2).