 ) on the Main toolbar, or by selecting Visual Objects Toolbar on the View menu, or by right-clicking on any toolbar and selecting Visual Objects on the shortcut menu that appears:
The following toolbar is shown by clicking Toggle Visual Objects Toolbar () on the Main toolbar, or by selecting Visual Objects Toolbar on the View menu, or by right-clicking on any toolbar and selecting Visual Objects on the shortcut menu that appears:
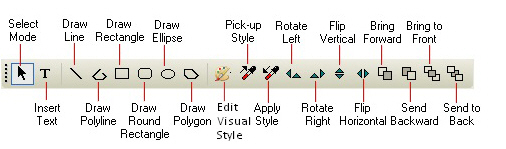
Each button is described below:
● The Select Mode ( ) button sets the mouse cursor to ‘Select Mode’. In this mode, mouse clicks can be used to select objects on the flowsheet.
● The Text Mode ( ) button sets the mouse cursor to ‘Text Mode’. In this mode, the next mouse click will be used to insert text in the flowsheet.
The next six buttons set the mouse cursor to ‘Visual Objects Mode’. When clicked, the mouse cursor will change to inform you that you are about to “Add a Visual Object”. The following objects are supported:
● The Line ( ) button enables you to draw a straight line.
● The Polyline ( ) button enables you to draw a polyline.
● The Rectangle / Square ( ) button enables you to draw a rectangle or square (if you hold down the Shift key while drawing).
● The Round Rectangle / Square ( ) button enables you to draw a round rectangle or square (if you hold down the Shift key while drawing).
● The Elliplse / Circle ( ) button enables you to draw an ellipse or circle (if you hold down the Shift key while drawing).
● The Polygon ( ) button enables you to draw a polygon.
To learn how to do draw the above visual objects, see Adding a New Visual Object. After you draw an object, you can move its vertices's (see Editing Existing Visual Objects) and you can also change its style (color, thickness, etc.) (see Editing the Style of Visual Objects).
● The Visual Style ( ) button allows you to view or edit the style of any selected object on the flowsheet. Just select the object you want to edit its style and click on this button. The object can be a stream, a unit procedure, a text or a visual object.
● The Pickup Style ( ) button allows you to quickly pick up (copy) the whole style of any object on the flowsheet (so that you can apply it to others later). Just select the object whose style you wish to copy and then click on this button. Then select the target object(s) and then click on the button shown next.
● The Apply Style ( ) button will apply a picked up (copied) style to the set of objects currently selected. It is only active if you have picked up a style previously and the set of currently selected objects is compatible to the style copied earlier.
● The Rotate Left ( ) button will rotate the set of selected visual objects by 90º to the left. It is only active if some visual objects (that can be rotated) are currently selected. Note that procedure icons, streams and text objects cannot be rotated.
● The Rotate Right ( ) button will rotate the set of selected visual objects by 90º to the right. It is only active if some visual objects (that can be rotated) are currently selected. Note that procedure icons, streams and text objects cannot be rotated.
● The Flip Vertically ( ) button will flip the set of selected visual objects vertically (i.e., around a horizontal axis). It is only active if some visual objects (that can be flipped) are currently selected. Note that procedure icons, streams and text objects cannot be flipped.
● The Flip Horizontally ( ) button will flip the set of selected visual objects horizontally (i.e., around a vertical axis). It is only active if some visual objects (that can be flipped) are currently selected. Note that procedure icons, streams and text objects cannot be flipped.
● The Bring Forward ( ) button will set the selected object(s) forward one position in the display order. When two objects overlap each other, the object in front (in the order) will show on top.
● The Send Backward ( ) button will set the selected object(s) backward one position in the display order. When two objects overlap each other, the object in the back (in the order) will show behind.
● The Bring To Front ( ) button will set the selected object(s) forward to the front of the display order.
● The Send To Back ( ) button will set the selected object(s) backward to the back of the display order.