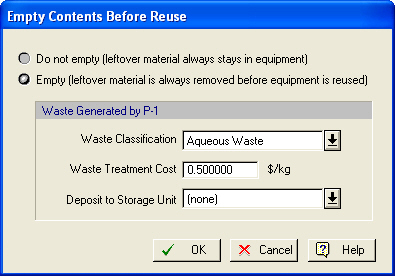
This dialog appears when selecting the Equipment Contents } Before Reuse } Empty to Local Receptacle option from the command menu of a unit procedure. This menu option is only available for procedures that share equipment resource. It allows the user to activate an automatic emptying policy for the equipment. Essentially, if the user neglects to empty the contents of the vessel and the vessel is about to be reused by another procedure (as part of the same batch execution) then if the automatic emptying is activated the contents of the vessel are dumped into a local receptacle (not shown on the flowsheet). This way, the next procedure is guaranteed to receive a vessel without any leftover contents from any previous reuse. If the next procedure utilizing the same equipment resource also terminates and leaves more material in the vessel (and there’s another procedure waiting to use the equipment) the contents once more will be removed to the local receptacle and added to the previously deposited material.
|
|
The automatic removal of leftover contents will not kick in after the last procedure that utilizes the equipment. This way, any left over amounts from the last procedure using the equipment will be left as equipment contents (in case they need to be use as initial amounts for the next batch simulation, or for the contents of equipment in some other process file). |
From this dialog you also get the chance to specify the waste classification of any leftover amount, so that it can be included in the totals reported by the application’s waste report. Note that amounts left in vessels are not considered as materials exiting the process, and therefore will not be added to the rates shown on material output graphs. If you wish to have any such leftover amount considered as material exiting the process, then you must include a transfer-out operation to remove it onto an output stream.
If the final contents happen to be waste of a special category that you are tracking using a dedicated deposit storage unit (see Material Storage Units) you can pick the destination storage unit on this dialog as well.
