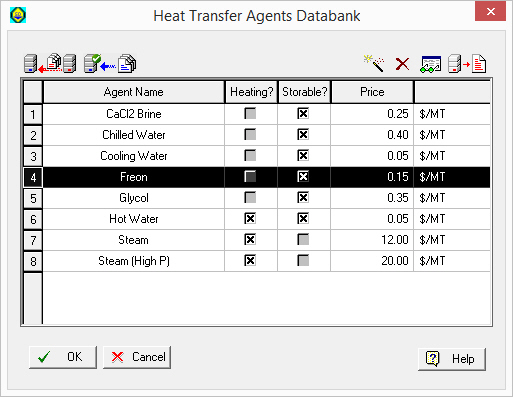
This dialog appear by selecting Databanks } Heat Transfer Agents from the main menu of the application.
From this dialog you can:
1. View the contents of heat transfer agent databanks (‘Designer’ or ‘User’).
2. Add, delete or modify the properties of heat transfer agents in your ‘User’ databank.
|
|
Using the ‘Database Filter...’ |
► To view/edit the contents of a heat transfer agent databank…
1. Choose a heat transfer agent from the table by selecting a row. Depending on whether you have selected a heat transfer agent that belongs to the ‘User’ or the ‘Designer’ databases you can either view and edit or only view the properties of that agent. The button icon for viewing/editing the properties of the selected agent changes accordingly from the View Properties (  ) button to the Edit Properties (
 ) button and vice-versa.
2. If you have chosen a heat transfer agent from the ‘Designer’ database, then proceed to view its properties by clicking on the View Properties ( ) button. The Heat Transfer Agent Properties Dialog will be displayed. This dialog presents in several tabs the property values for the selected heat transfer agents. Notice that you cannot modify and save any values on this dialog. If you have chosen a heat transfer agent from the ‘User’ adatabse then, instead of the View Properties (
 ) button, the Edit Properties (
 ) button will appear. After selecting a heat transfer agent, and pressing this button, the Heat Transfer Agent Properties Dialog will appear once again, only this time, you can view as well as edit and save new property values for the selected heat transfer agent.
► To add a new heat transfer agent in the ‘User’ databank…
3. Click on the Add New Agent ( ) button. After you type in an acceptable name (must be unique amongst all heat transfer agents in the ‘User’ and the ‘Designer’ database,) a new line will be added in the table to represent the new heat transfer agent. Before you save the new heat transfer agent as part of your ‘User’ databank, you may edit its properties by clicking on the Edit Properties (
 ) button.
|
|
Make sure you have typed the name of the heat transfer agent correctly. Once the agent is included in the databank, this field cannot be edited again; the only way to modify it would be to completely remove it from the databank and introduce it again with the new name. |
► To delete a heat transfer agent from the ‘User’ databank…
4. Select the heat transfer agent that you want to delete (click anywhere on that heat transfer agent’s row). If the agent resides in the ‘User’ database the Delete ( ) button is enabled.
5. Click on the Delete ( ) button.
► To save the ‘User’ databank…
6. To save the changes made in the databank back into the ‘User’ database, you may either click on OK (this will exit the dialog) or you can click on the Save Database to Disk ( ) button (this will save the data but keep the dialog session open).
|
|
Once the changes in the databank are saved into the ‘User’ database, they are irreversible. In case you change your mind about changes made, and these are not yet saved, you may cancel changes and revert to the saved databank by clicking Cancel on the dialog. |
See Also:
● Heat Transfer Agents Databank


